
Get Started (Beta UI)
Set up
To start using Relay, you will need to have a commercial agreement with a demand partner(s).
Once you have this agreement signed, you will need access to their platform and will need to set up a test campaign/inventory. In this tutorial and your testing of Relay, you’ll be sending requests targeting this test campaign inside the demand partner.
If you are a publisher, you will need to set up Ads.txt files (example here). If you are reselling publisher inventory, you will need a sellers.json file (example here) under your domain, and each publisher will need an ads.txt file that lists you as an approved seller.
In this tutorial, you will be creating a “Demand Partner”, a “Placement”, and a “Site” using the Relay UI. This automatically creates entities inside your Kevel ad server that will enable you to send programmatic bid requests to third-party demand partners. After completing this tutorial, you will see entities inside Kevel marked as “Relay managed entities - Do not touch”.
Creating Demand Partner
First, you will need to create a Demand Partner inside the Relay UI. A demand partner represents your SSP or DSP that will be bidding on your inventory, and its fields hold the global settings that apply for all of that partner’s monetization. If you have multiple accounts at a demand partner, you should create multiple demand partners holding different information.
To do this, navigate to the “Demand Partner” page and click “Add New Partner”.
Give your demand partner a name like “Index Exchange”, and select your chosen partner from the dropdown list, in this case: “Index Exchange”. If you don’t see your desired partner on this list, please reach out to your solutions architect to enable this partner.
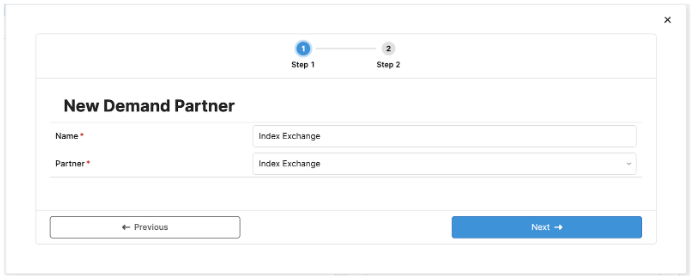
Note: This step will automatically create an “RTB Advertiser” inside your Kevel UI. You will see this entity created as “Relay Managed Entity - DO NOT TOUCH”.
Once you have selected your partner and entered a name, select “Next” and you can enter additional settings for your demand partner.
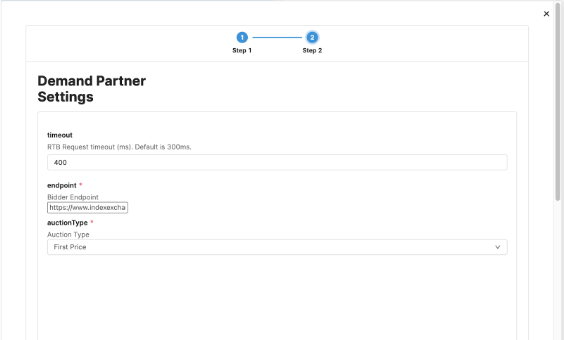
In this case, we will be entering in the desired auction timeout, bidder endpoint, and auctionType. Information like bidder endpoints or SiteIDs should be provided from your account rep at the demand partner and is used to identify your inventory in their system.
Creating Placement
Now that you have a Demand Partner, you can create a “Placement” in Relay. Every unique programmatic ad slot on your website or app should be represented by a Placement. This "Placement" inside Relay will automatically create an RTB flight and ad inside Kevel.
In this example, we will create a “homepage banner” placement for Index Exchange. Any placement in Relay can be assigned to multiple demand partners.
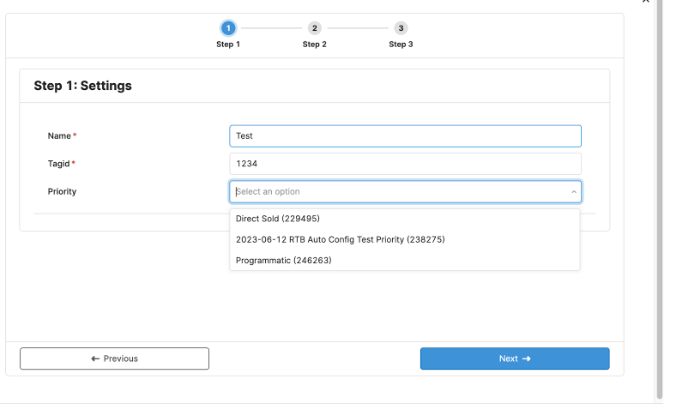
One you have navigated to the “Placements” page, click “Create Placement”. You’ll see a modal that prompts you to enter the “Name”, “TagID” and “Priority”.
The “TagID” is your unique identifier used for this ad unit, and will be used by the custom targeting for its flight. The “Priority” selects how you would like for this Placement to be mediated with your existing Kevel demand. In order to complete this field, you will need to have existing priorities created inside Kevel’s ad server.
Note: Depending on your monetization goals, you may want to create a new priority for programmatic or you may want your programmatic demand to compete alongside your direct sold. Additionally, you can create separate priorities to run Private Marketplace/Programmatic Guaranteed deals ahead of your open auction.
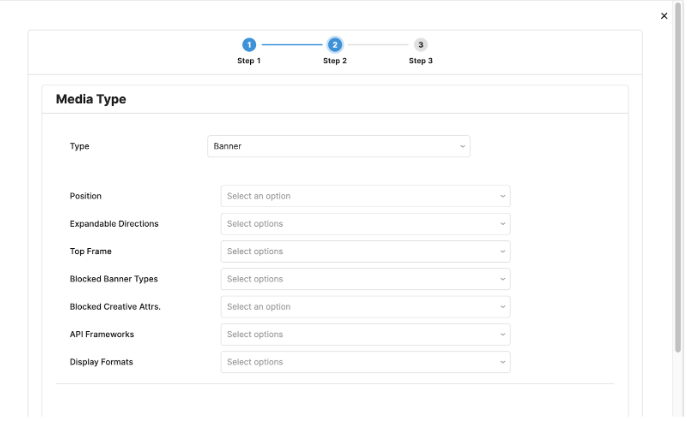
Once you are done, click Next and we will configure your “Media Types”.
For this example, we are setting up a banner unit. Once you’ve selected Banner, you’ll see a new series of fields that allow you to describe your inventory to a demand partner.
Typically the more information that is included here the better your demand partners can identify and bid on your inventory. You should reach out to your demand partner for feedback on their desired fields and identifiers on the bid request.
For a full list of these fields, please refer to the OpenRTB 2.5 spec.
Once you’ve completed the Media Type, you will attach a demand partner to this placement and configure placement-level settings for that partner.
Each demand partner requires unique fields related to your Placement that help them better identify and bid on your inventory. Additionally, here you are able to configure deals that you have set up inside this demand partner.
In this example, we will select the “Index Exchange” Demand Partner that we previously created, and will enter our SiteID and a DealID. The DealID is generated inside of the SSP if you are selling your inventory using Deals.
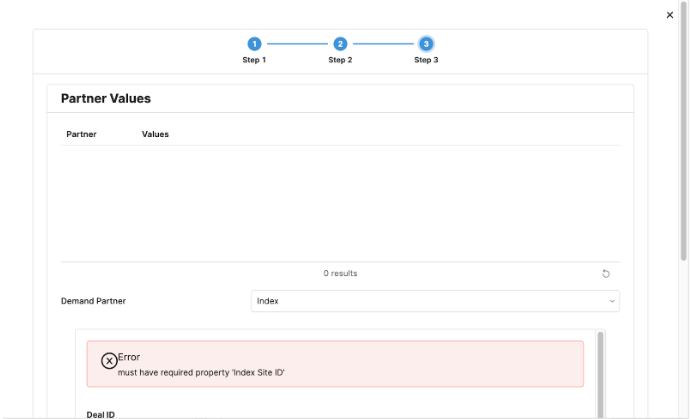
In order to move forward, you will need to add this data to your Partner Values table. Once you’ve added this data to your “Partner Values” table, you can now click “Create Placement”, and see the Placement appear on your main page.
Creating Site
The final step to Relay configuration is creating a “Site” which will represent settings for your website or app. These are inventory specific settings that will apply across any monetization with this channel.
In our example, we are going to create a website.
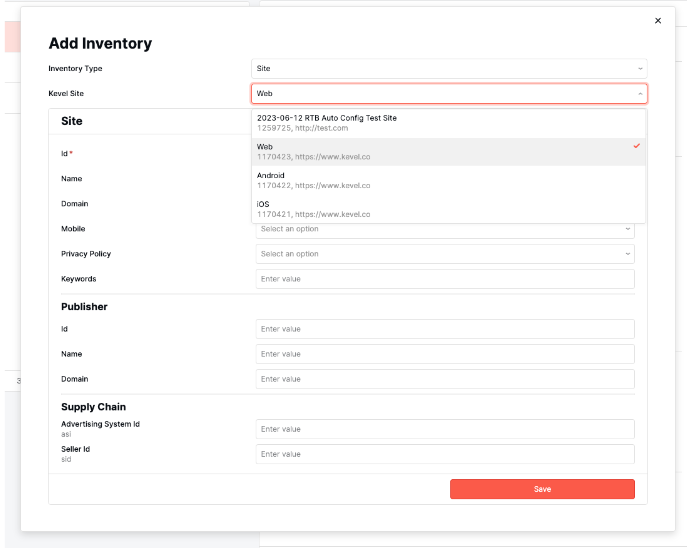
Select “Site” as the Inventory Type and choose from your existing Kevel Sites that you’d like for this Relay entity to be associated with.
Note: In order to move forward here, you will need to have your Site already created in Kevel.
Once you’ve selected your Site, you’ll see a number of fields that you can use to store static data associated with your website.
For a full list of fields please reference the OpenRTB 2.5 spec and talk to your demand partner to see what fields they recommend.
Next, you can configure your SupplyChain Object which is a required field by most demand partners. When you register your site with the IAB you will be given an Advertising System ID and a Seller ID. Input those here and they will be included in all of your bid requests for this inventory.
Once you have created your Site, you are done with your Relay UI configuration. Now you will be able to see your “Relay Managed Entities” that the UI has created inside Kevel’s ad server.
Sending ADR
For the final step, we will construct an Ad Decision Request that will target this entity and thus generate a programmatic bid request.
When sending your decision request, you’ll need to have a Placement in the Placements array with the following fields:
- divName
- networkID
- siteID
- adTypes
There are some other additional fields that you may want to include as a best practice:
IP address
- URL
- UserID (if user sync is enabled)
- User agent (in request header)
All other fields (ex: PMP Deal ID, Geo, etc) are automatically derived from your configuration in the Relay UI as well as contextual data on the request.
Additionally, if required, User Matching with the SSPs can be achieved, and is documented here: https://dev.kevel.com/docs/using-the-relay-usersync-script
Now, you will need to construct a Decision Request that targets your network, placement, and site within Kevel. If you aren’t familiar, here is a link to documentation on how to construct a Decision Request (link).
Here is an example below:
{
  "placements": \[
	{
  		"divName": "TAGIDOFPLACEMENT",
  		"networkId": 1,
  		"siteId": 122333,
  		"adTypes": [5]
	}
  ],
  "user": {
	"key": "u-123"
  },
Updated 8 months ago