Creatives (Text)
Overview
Within your ad campaigns, you may use content that consists solely of text in some of your creatives. These are known as text creatives. The following sections discuss a number of important uses of text creatives.
Using Static Text Link Ads
With a static text link you can hyperlink any text in your website and allow Kevel to track each click and/or each time the link is viewed.
Before you can use Static Text Links, you must add the "0 x 0" (adtype 20) ad size to your network and channel.
Follow the procedure below to set up a static text link.
- Open up a new creative for your flight.
- Choose the Static Text Link option.
- Give the creative a name.
- Enter in the Click URL for the creative.
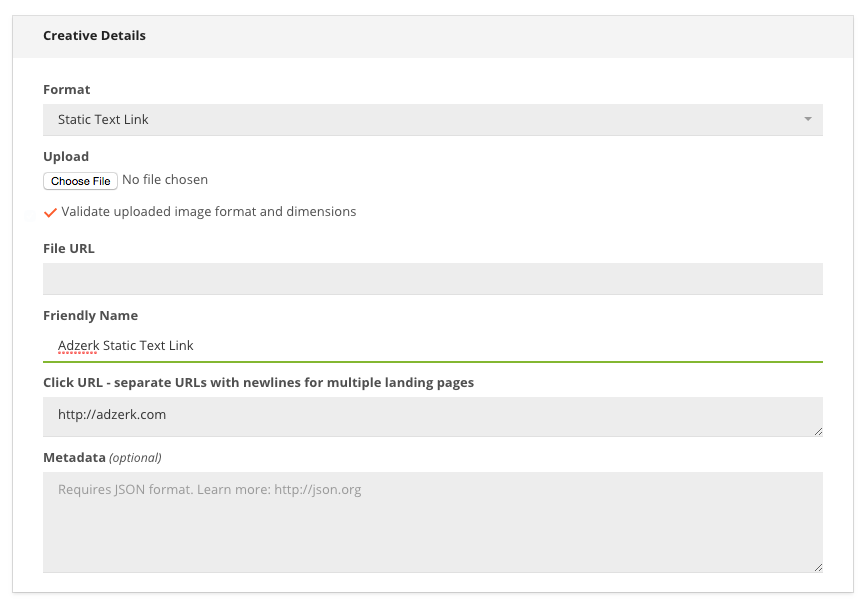
- Save the creative.
- Save the flight to reload the page. You will not be able to obtain static text link code before saving a flight for the first time.
- Click on the three dots next to the ad name. Select "Generate Ad Code".
- In the Generate Ad Code page, Choose a Site (required) and a Zone or Keywords (optional).
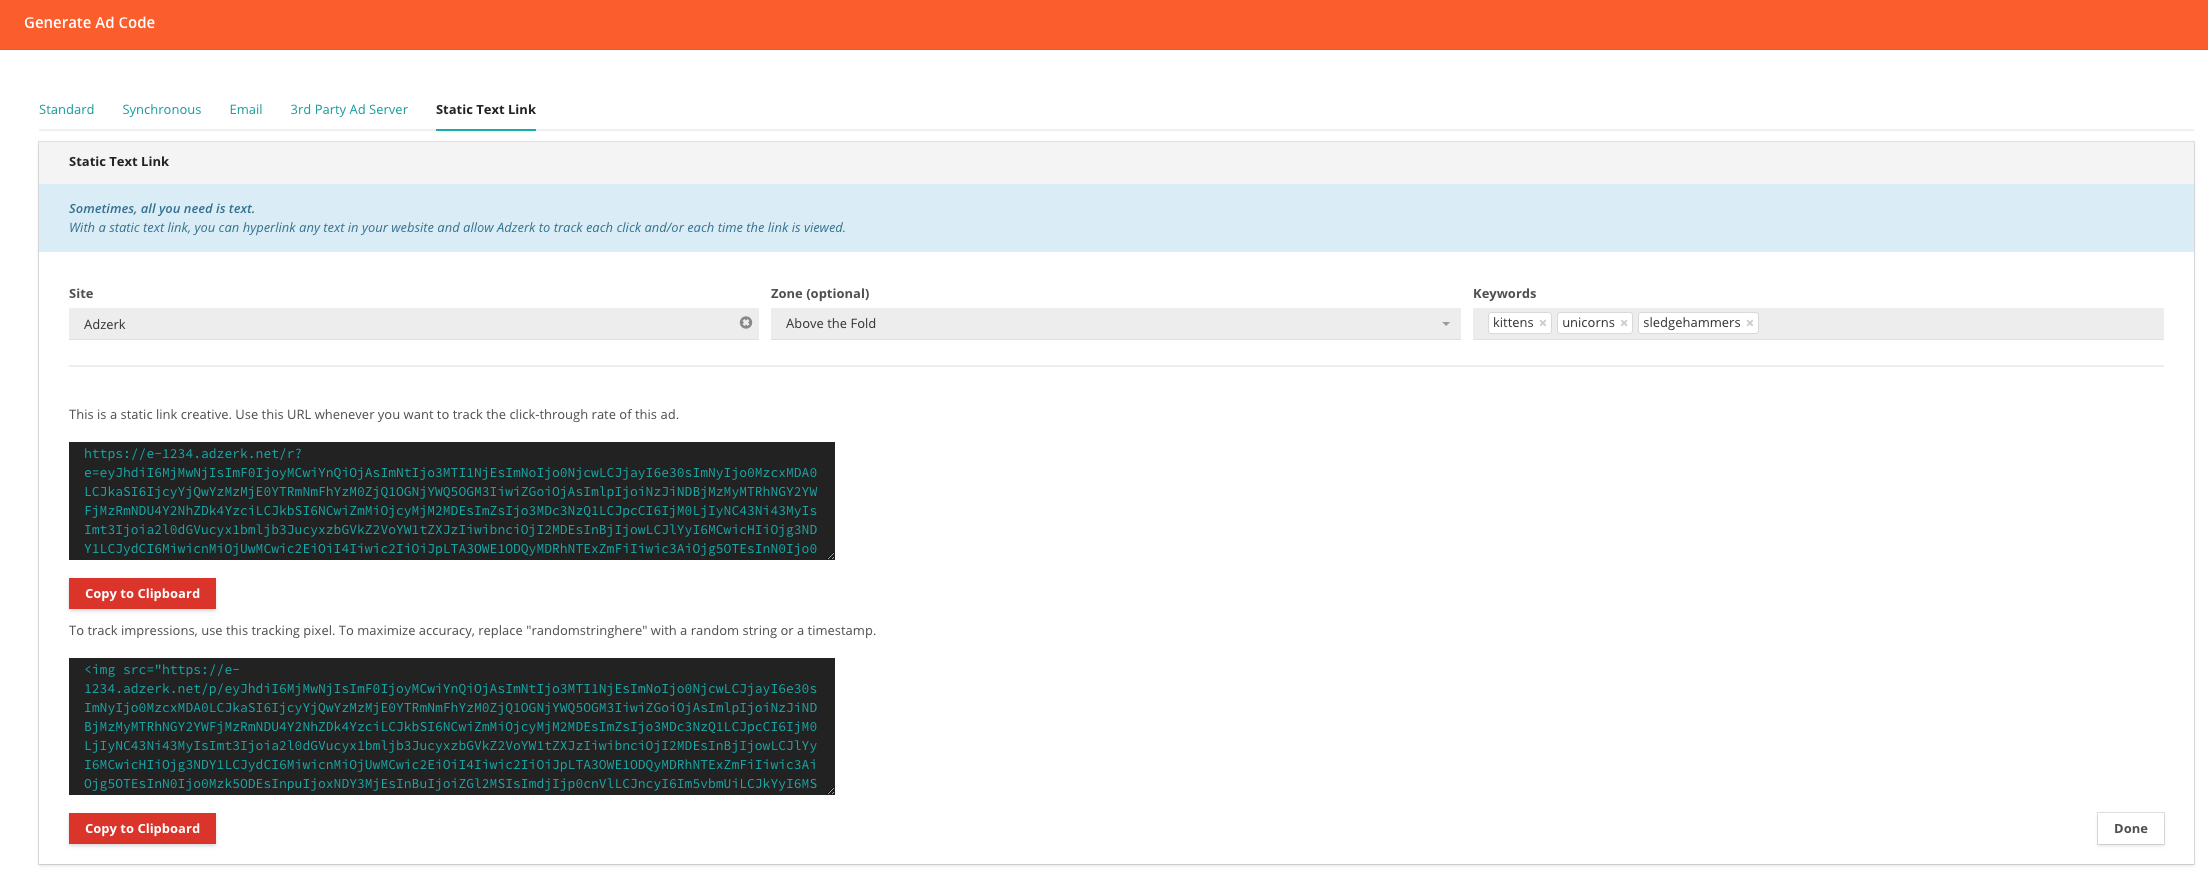
- The first link generated is the click tracking URL, and the second is the impression tracking URL.
Static Text Link Generation Rules
- An ad must be set to active before you can generate static text link URLs for it.
- You must choose a site.
- The site you choose must belong to the same channel as the flight's priority.
- Keywords must not contain disallowed characters.
- Static links expire after a preset period of time.
Tracking an Impression
Next to or near your link you can add in the image tag given to you on the preview page. If you're not sure how to append a random string or timestamp, use the following example:
<script type="text/javascript">
// <![CDATA[
document.write('<img src="https://a-unique-url-will-show-here.gif?r=' + new Date().getTime() + '"/>');
// ]]>
</script>
Tracking a Click
Simply use the URL from the example above as the click link on the text you want track a click on.
Serving Text Links in List Item Format
You can set up text link ads to serve in a "list item" format. Each text link can be for a different advertiser. You can also set it up so that a single advertiser's ad does not show multiple times in the list on a single page load.
Follow the procedure below as an example of setting up text links in list item format. In this case, we will have a list of three items, each of which is an ad served in the form of a text link. Each time the page loads, three of six different ads will appear. Each link is for a different advertiser.
- Create a campaign for each advertiser. For each campaign create a flight set to your specified impression goals.
- In 'Distribution' tab, check the 'Don't Allow Duplicates' box by Flight
- Add a new creative for this flight, making it a JavaScript/HTML creative using the 300x20 ad size (if doesn't exist, you can add it). Use the the following HTML code format for your creative:
<img src="https://your-domain.com/your-self-hosted-list-item-image.gif" />Advertiser Text- Save creative
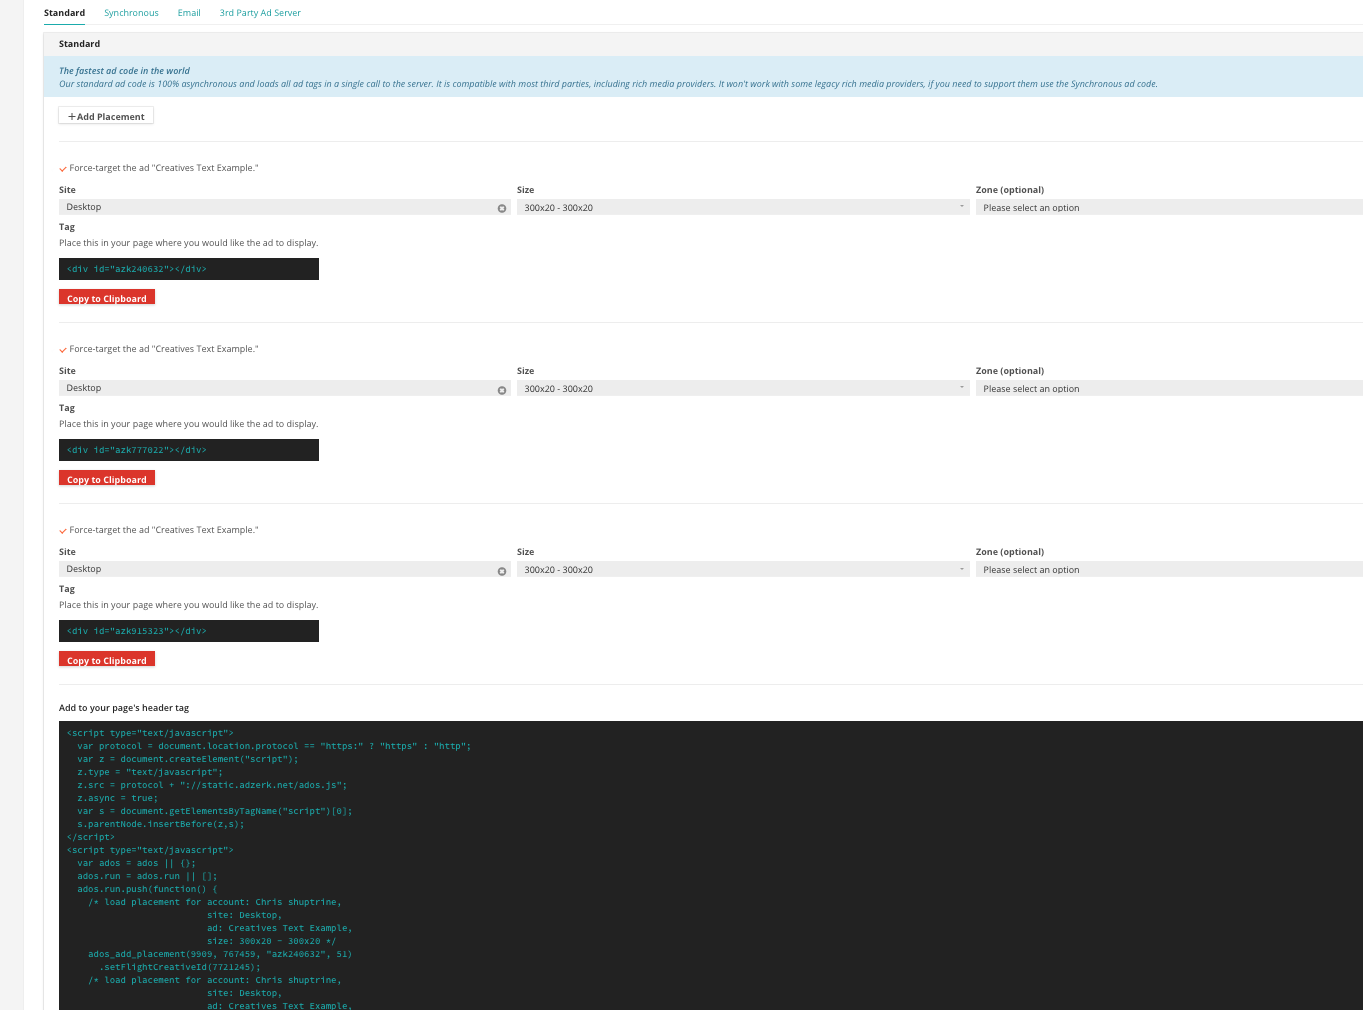
- Generate the ad code by clicking on the three dots on the right and selecting 'Generate Ad Code'.
- Change the tab at the top to 'Standard' from '3rd Party Ad Server'
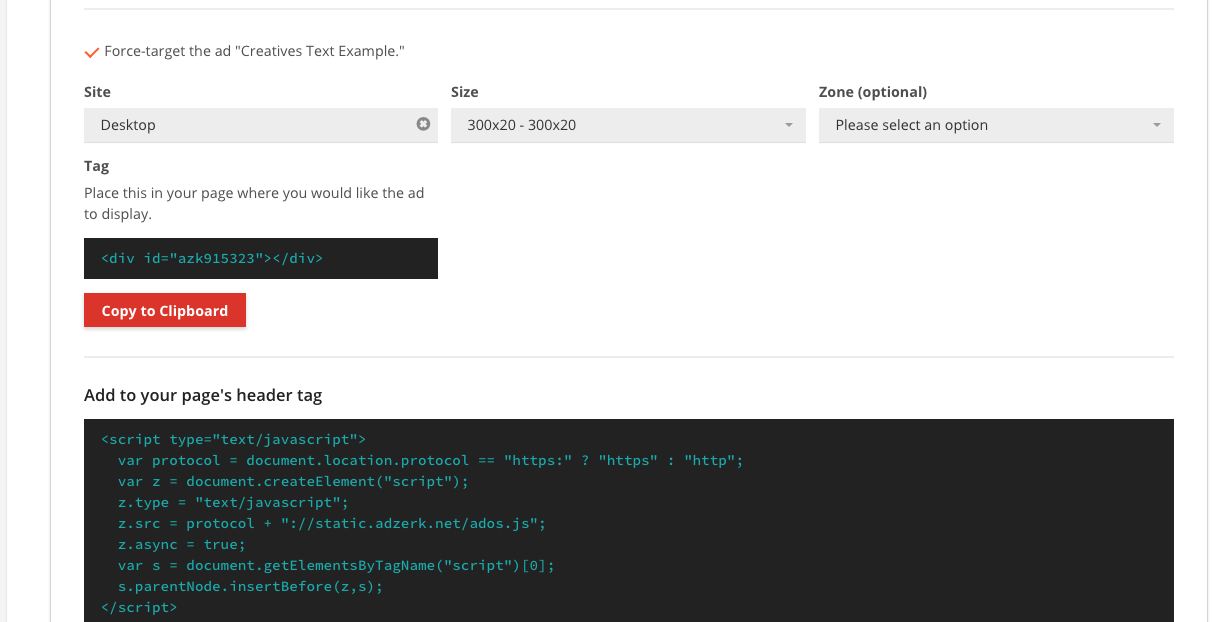
- In a scenario with three items in the list, add two more placements with the "+ Add Placement" button. Each should be the 300x20 ad size with no zone targeting.
- Place the script in the header of your site
- Place each div in one on top of each other wherever you want the list to show
Serving Text Ads as JavaScript/HTML Creatives
In addition to serving text ads as image files, you can set them up using JavaScript/HTML creatives.
Use the following procedure to set up JavaScript/HTML creatives for text ads.
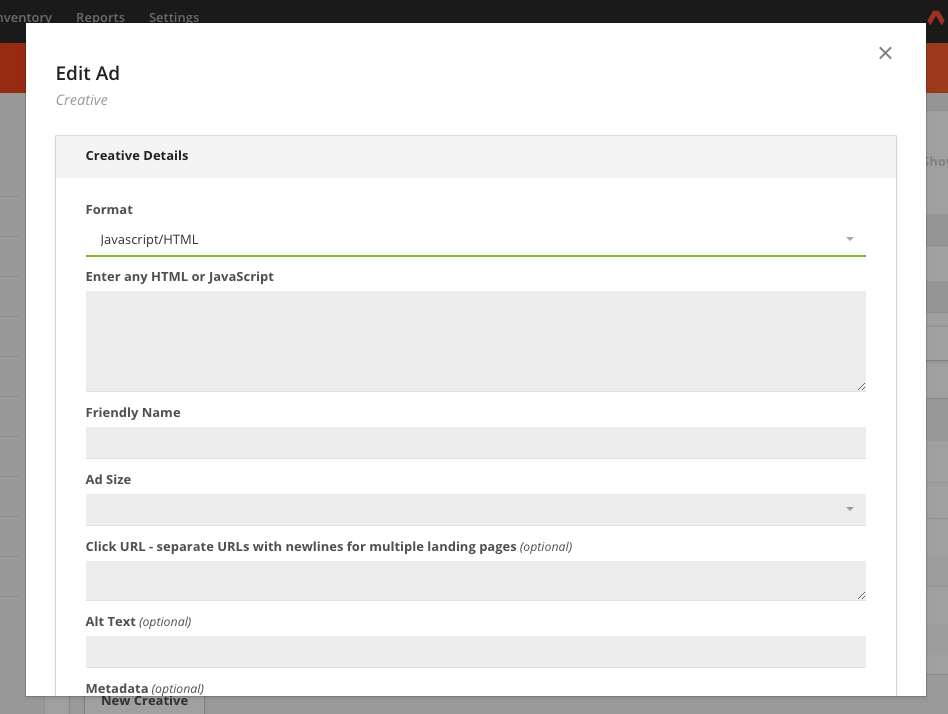
- Create a new creative
- In the Creative Details box under Format, choose JavaScript/HTML.
- Insert the JavaScript or HTML of the text ad into the text box. You can also include CSS styling.
- Optional: To track clicks, replace the destination link in your code with our click-tracking macro
{{url}}. - In the Friendly Name field, enter a name for your creative.
- From the Ad Size drop-down menu, choose an ad size. You can create a new ad size if you don't see the size you need.
- Insert your destination link in the Click URL field.
- Save the creative.
- Generate ad tags for the size of the creative you just set up.
Your text ads will be eligible to serve.
Serving Multiple Text Ads in One Creative
As an Kevel user, you can set up multiple text ads within one creative. Here is an example:
The best way to accomplish this is by nesting creatives inside a creative. This way, each text ad is tracked individually, as well as the container for the text ads.
Follow the steps below to set up multiple text ads in one creative.
- Set up a campaign with one flight per creative.

- In the Distribution section of each flight, check Don't Allow Duplicates at the Flight level. This will ensure you don't get the same creative served multiple times in your block of text ads.

- Create a New Creative in each Flight using the JavaScript/HTML format. Use the following template code for the HTML box. Be sure the div id's are the same as everywhere else in the code.
<a class="header_link" href="%url%">Need an ad server? Why not Adzerk?</a>
<br />
<span>This is a short description of what Adzerk does is why you should check it out</span>
<br />
<a class="footer_link" href="%url%" target="_blank">http://adzerk.com</a>- Set up the creative that contains the other creatives. Use the setup below that combines the previous one. It contains all of the style (feel free to customize however you want). This uses the synchronous code inside the creative.
<script type="text/javascript" src="https://static.adzerk.net/ados.js"></script>
<script type="text/javascript">
  ados.isAsync = false;
  ados_add_placement(YOUR_NETWORK_ID, %siteid%, "azk1", 20);
  ados_add_placement(YOUR_NETWORK_ID, %siteid%, "azk2", 20);
  ados_add_placement(YOUR_NETWORK_ID, %siteid%, "azk3", 20);
  ados_add_placement(YOUR_NETWORK_ID, %siteid%, "azk4", 20);
  ados_load();
</script>

<!-- customize the look of your creative here -->
<style type="text/css">
  #textadbox {
    border: solid 1px #000099;
    width: 290px;
    height: 240px;
    padding: 4px;
    font-size: 11px;
    font-family: sans-serif,helvetica;
  }
  #textadbox .header_link {
    font-size: 14px;
  }
  #textadbox .footer_link {
    font-size: 9px;
    color: green;
  }
  .textadslot {
    margin-bottom: 10px;
   position: relative !important;
  }
</style>
<!-- end css -->

<div id="textadbox">
  <div id="azk1" class="textadslot">
    <script type="text/javascript">ados_loadDiv("azk1");</script>
  </div>
  <div id="azk2" class="textadslot">
    <script type="text/javascript">ados_loadDiv("azk2");</script>
  </div>
  <div id="azk3" class="textadslot">
    <script type="text/javascript">ados_loadDiv("azk3");</script>
  </div>
  <div id="azk4" class="textadslot">
    <script type="text/javascript">ados_loadDiv("azk4");</script>
  </div>
</div>
Make sure to replace YOUR_NETWORK_ID with your network id. You can grab your network id by generating ad code and looking at the ados_add_placement function, which goes like this: ados_add_placement(networkId, siteId, divId, adTypeId). You should leave the other arguments in the example the same.
- Save the creative and serve it as you normally would.
Updated 5 months ago
