
Misc Creative Features
Hosting an Image with Kevel and Locating Image URL
You can use Kevel to host an advertiser's image or SWF file to be used in an HTML/JavaScript creative. Typically you would need to do this if your advertiser simply sends you an image/SWF file that is not hosted but needs to be included in any custom coded creative. Common cases where this approach is needed are:
The advertiser gave you an image file and a click URL but wants to track the impressions on its end by serving a tracking pixel in addition to the image (serving two images in one creative).
The advertiser gave you a SWF file that needs to be served as an interstitial ad (a pop-up ad that takes over the page).
Steps:
Use the following steps to upload an image/SWF as a creative and get the Kevel source URL for it.
- On the flight settings page, click "Create Ad" to make a new creative
- Upload the image and input the creative details page and enter in the creative details (Name, Size, and Click URL). Save.
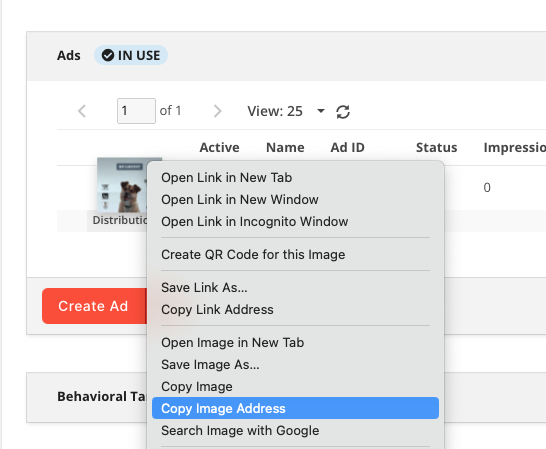
- After saving the creative, right click on the image you see in the flights page, and choose "Copy Image Address". See screenshot below.
- Paste the image address into a browser to ensure you did step 3 correctly.
You now have the Kevel hosted image/SWF URL to use in your HTML/JavaScript creative.
Serving a Creative Hosted Elsewhere
You can serve a creative hosted on another server:
- Choose "HTML/Javascript" as the creative's format
- Copy and paste image and hyperlink tags into the text box. If you have tags generated by another ad server, paste those. If you do not have tags for the creative, use this basic template:
<a href="{{url}}"><img border="0" src="URL_OF_THE_CREATIVE" /></a> - Replace
URL_OF_THE_CREATIVEwith the full URL of your creative. Do not replace{{url}}. This is our click tracking macro, which enables the tags to register clicks in Kevel - Enter the destination URL for the ad in the Click URL field
Creative Previews
Creative previews render a creative's code or its uploaded file in your browser window without needing to serve the creative as an ad.
Creative previews show you what an ad will look like when served directly to an HTML page. This makes them useful for uploaded images or for ads that use JavaScript or iframe tags, etc.
If you are previewing a JSON ad, the preview will display the contents of the JSON object in the browser.
Creative previews will also render any macros that have been added to a creative.
Creative preview links are publicly accessible so they can be shared with advertisers and agencies if needed.
There are three places in the Kevel UI where you can preview a creative:
- On the flight's page, scroll to view the "Creatives" section. Click the thumbnail or HTML 5 shield next to the name of the creative in "Creatives in this Flight"
- Also on the flight's page, scroll to view the "Creatives" section and click the "All Creatives for this Advertiser" tab (UI 1.0 only)
- On the All Advertisers page, click "creatives" next to the name of an advertiser (UI 1.0 only)
- The creative will be rendered on the kevel-preview.com domain. However, image creatives that were uploaded as a URL instead of uploaded to Kevel's servers will be previewed using their original URL
Creative previews use the HTTPS protocol. If you attempt to preview a creative that calls an HTTP URL, we will throw a warning reminding you that we don't support HTTP content over HTTPS.
Serving Multiple Ad Sizes in One Slot
You can have Kevel serve multiple ad sizes to the same slot using a simple modification to the ad code. To do so, follow the steps below.
- Generate your ad code. You should get something like this:
<script type="text/javascript>var p="http",d="static";if(document.location.protocol=="https:"){p+="s";d="engine";
}varz=document.createElement("script");z.type="text/javascript";z.async=true;z.src=p+"://"+d+".adzerk.net/ados.js";
vars=document.getElementsByTagName("script")[0];s.parentNode.insertBefore(z,s);</script>
<script type="text/javascript">
var ados = ados||{};
ados.run = ados.run ||[]
ados.run.push(function(){
ados_add_placement(1636, 15421, "azk43331",5);
ados_load();
});</script>The part you need to change is the
ados_add_placement(1636, 15421, "azk43331",5);section. In this example, 5 is the ad type id. When you change the value in the size drop-down menu in the ad code, you will see that value change.
- Gather the ad type IDs of the sizes you would like to load. In this example we will use
5(300x250) and43(300x600). All you need to do is change the original5to a comma-separated list of values in square brackets like this:
ados_add_placement(1636, 15421, "azk43331",[5,43]);
- Copy and paste your modified ad code like you normally would.
You can use as many values as you want, for example
[1,2,3,4,5...].
Setting Anchor Tags
To do this, you'll have to use Dashboard 1.0; we are in the process of migrating the functionality to 2.0.
The default for directly uploaded creatives is to open a link in a new window (the HTML anchor tag target="_blank".) If you are uploading Javascript/HTML creatives, you must manually set the target of the anchor tags by including the target in your code.
If you want the link of a directly uploaded creative to open in the same window, you will need to change the target to _top.
To set up:
Use the following procedure to set up your creative as an HTML creative and set the target of the anchor tag:
-
Navigate to and edit the static image creative in the web interface
-
Click View Image
-
In the preview, copy the URL in the address bar. This is the URL to the image on our CDN
-
Create a copy of the creative by clicking Duplicate next to the creative
-
Edit the copy of the creative and change the format to JavaScript/HTML
-
In the HTML file input the following:
<a href="%url%" target="_top"><img src="CDN_URL" /></a> -
Replace CDN_URL with the image URL you copied earlier. Then click Save
-
Deactivate the original static image by clicking its toggle under the Active column to off
Refresh Ad Fixed Number of Times
To refresh an ad on a page an unlimited number of times, refer to the :modifying-the-ad-code) (doc:modifying-the-ad-code) article. This functionality is built into Kevel.
To refresh an ad a fixed number of times (such as an ad that refreshes five times, then stops), you can add JavaScript that calls the ados_load(); function for a fixed number of ad calls. Here is an example:
<script type="text/javascript">
(function() {
	var timesToRun = 5;
	var secondsPerRun = 10;
	var timesRun = 0;
	var interval = setInterval(function(){
		timesRun += 1;
		if(timesRun === timesToRun){
			clearInterval(interval);
		}
		ados.run.push(function() {
			//copy/paste placement(s) you want refreshed from above
			ados_add_placement(1636, 15421, "azk1", 4);
			ados_load();
		});
	}, secondsPerRun * 1000);
})();
</script>
timesToRun is the number of times the ad should refresh, and secondsPerRun is the number of seconds until the next refresh. You don't need to modify the timesRun variable, since it's just a counter.
To implement the code:
- Place it as a separate block of JavaScript underneath the ad code JavaScript in the
<head>of your page - Set the
timesToRunandsecondsPerRun - Copy the
ados_add_placement();andados_load();functions from your ad code into theados.run.push(function()section. This is commented in the example
Updated 10 months ago