Retail Media Guide
Contents
- Retail Media Overview
- How Kevel works
- Getting started with Kevel
- Sponsored Listings
- Additional Ad Formats
- Campaign Management
- Ad Decisioning
- Reporting
Retail Media Overview
Retail media has emerged as a highly lucrative and an essential part of the media mix for advertisers. It offers retailers a powerful monetization platform to drive business growth and improve customer engagement, while offering these key attractions to advertisers:
- First party and zero party data: Leveraging first party data (directly collected user data) and zero party data (opted-in user data) ensures a future-proof data strategy. Advertisers rely on deterministic data from retailer transactions and loyalty programs to gain a comprehensive 360 view of customers, rather than relying on stitched together probabilistic data.
- Closed loop attribution: Transactions take place within the retailer's ecosystem, eliminating the need for complex cross-channel attribution. Ad impressions or clicks can be directly linked to actual transactions.
While data and the closed loop ecosystem are crucial for advertisers looking for channels to allocate their budgets towards, the primary allure lies in the alignment of incentives.
Retail Media aligns the interests of customers, advertisers, and retailers. Relevant ads inform customers about suitable products, advertisers target the most relevant customers for better ROI, and retailers can boost ad revenue and merchandise revenue while enhancing the overall retail experience.
At Kevel, we strongly believe that the longevity of any ad platform relies on aligning incentives. That's why we provide a range of products tailored to assist retailers in creating an ad platform that prioritizes activities leading to success. These activities can be bucketed into:
- User Growth: Marketing activities that attract new users to your site/app and effectively retain existing users.
- Kevel Audience for audience segmentation. Useful for tactics centered around user acquisition, user retention, win-back campaigns, and loyalty building
- User Experience: Onsite personalization and the serving of relevant ads.
- Kevel Audience to gain valuable insights into user behavior and create machine learning-driven audience segments that cater to both marketing and ad monetization goals.
- Kevel Ad Server(this guide will focus on Kevel Ad Server) to serve personalized content and relevant ads to audiences built from Kevel Audience.
- Demand: Boosting demand through diverse buying experiences and providing metrics that enhance the attractiveness of your ad program to advertisers.
- Kevel Relay opens up programmatic demand channels
- Kevel Self Serve creates a user experience for long tail advertisers to build out their own campaigns
- The Kevel Ad Server offers an off-the-shelf admin UI that simplifies handling managed direct demand
- Ad serving options in terms of GMV, ROAS, and attribution provide valuable metrics for advertisers to measure the effectiveness of their campaigns.
How Kevel works
At its core, the Kevel Ad Server is made up of three main groups of APIs:
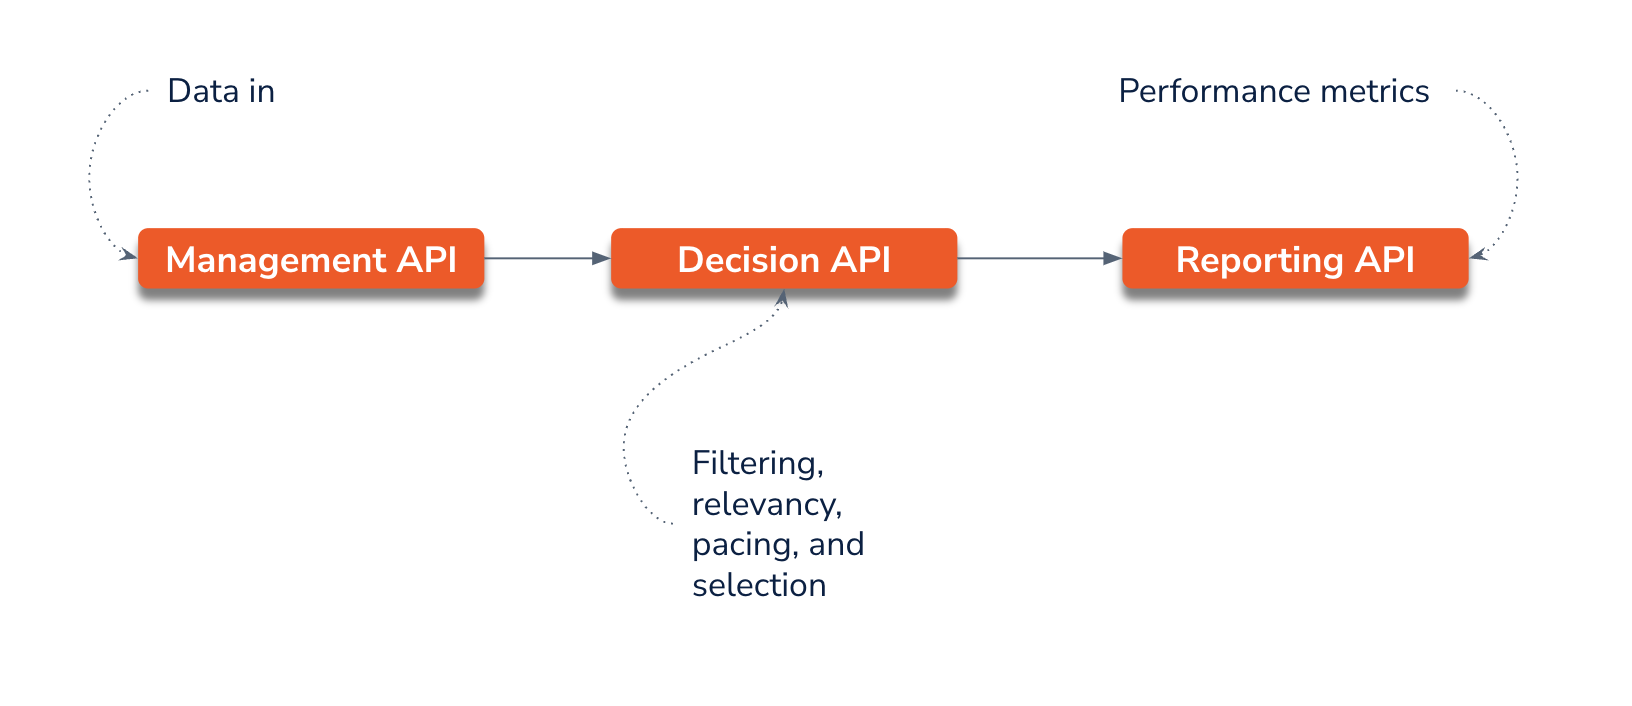
Management API: The Management API handles inventory and campaign management. The data input and schema created through this API have a direct influence on the factors considered by the Decision API when making decisions and how the Reporting API displays metrics.
Decision API: Matches the parameters in an ad request with the attributes and rules associated with specific ads. This matching enables the system to determine and return the most suitable ad(s).
Reporting API: Access to performance metrics.
At a high level, this is the process flow within Kevel:
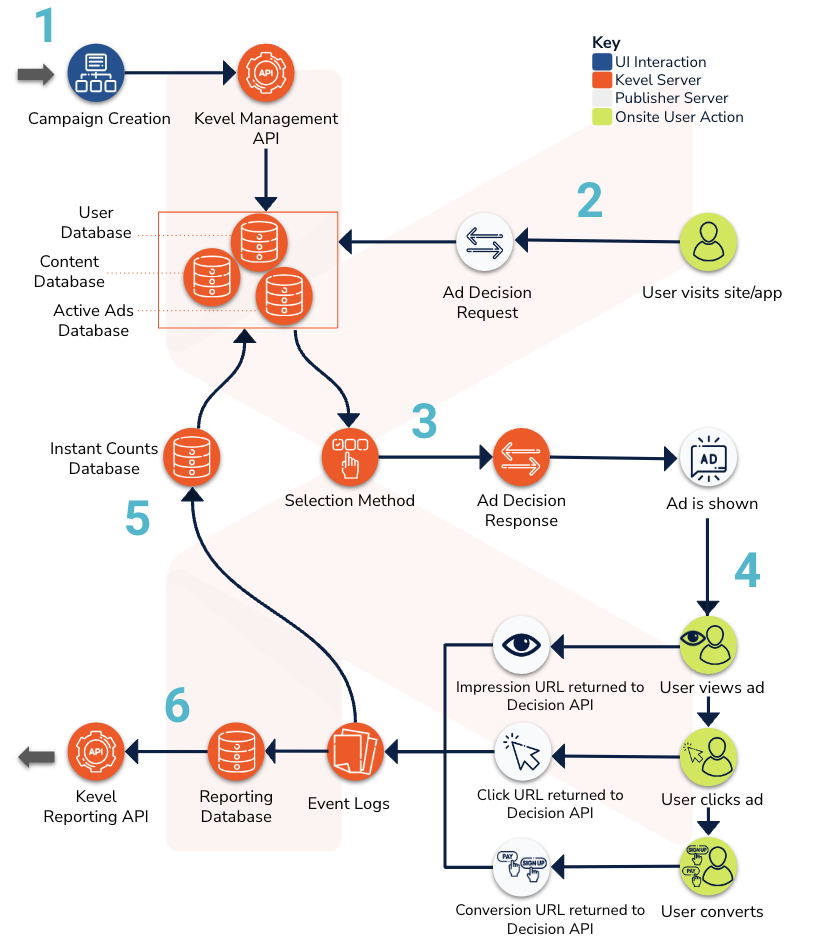
- Ads can be created through Kevel’s Admin UI, Self Serve UI, or you can create your own UI using Kevel’s Management API. APIs can also connect with a third party OMS or CRM as part of your campaign management workflow.
- A user’s visit triggers an Ad Decision Request to be sent to Kevel’s Decision API at page/app load.
- The request parameters are used to filter through the Active Ads Database. The selection method determines which ad wins if there is more than one eligible ad.
- The Ad Decision Response includes the ad content and tracking urls of the selected ad(s). Once an ad is shown, the various user interactions are returned to Kevel’s Decision API for event tracking.
- Events are sent to two databases, the Instant Counts Database and the Reporting Database. The Instant Counts Database informs ad pacing and provides feedback to the Active Ads Database. Additionally, it serves as a data source for real-time campaign monitoring through the Real-time Reporting API.
- After undergoing additional processing, events are directed to the Reporting Database. Subsequently, the Reporting API retrieves the data from this database, enabling reporting within the Admin UI, populating custom reporting dashboards, or integrating with third-party reporting tools.
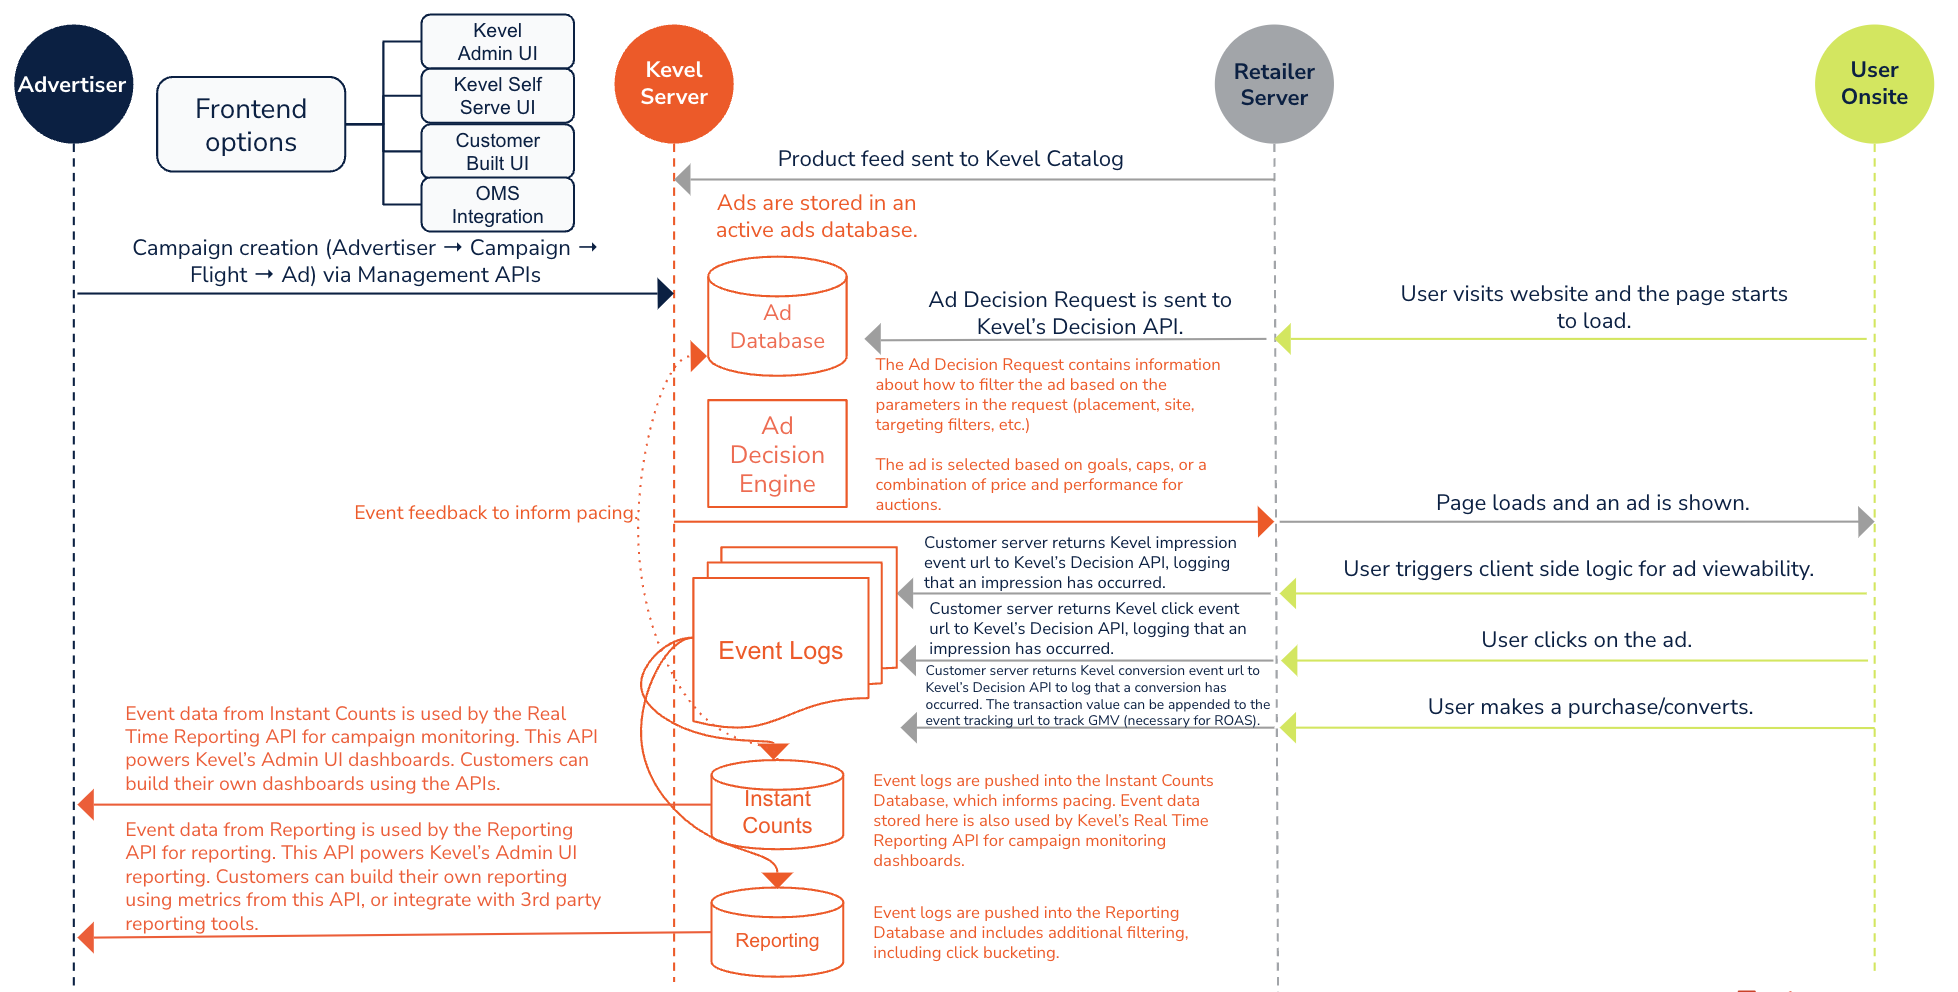
Another view of the above process flow
Getting started with Kevel
If you're brand new to Kevel, the below links will help get you oriented:
Topic | Description |
|---|---|
Detailed instructions for launching a test ad. | |
Details on managing user access to Kevel. | |
Quickstart guide to understanding the Management API for inventory and campaign management. | |
Detailed guide to Kevel's Zerkel query language used for rules based custom targeting. | |
Quickstart guide to understanding the Decision API for ad decisioning and delivery. | |
Developer tool for troubleshooting and understanding why an ad was or was not selected. This option is a header that is added to your API call and can be used on any API platform. | |
Developer tool for troubleshooting and understanding why an ad was or was not selected. This is the same as the above option, but instead of adding a header to an API call, this is a more user friendly interface. |
The remaining sections of this guide will cover specific features for retail media, organized into the following topics:
Sponsored listings
Sponsored listings are an attractive entry point into retail media, using Kevel's retail media focused features gets you started quicker:
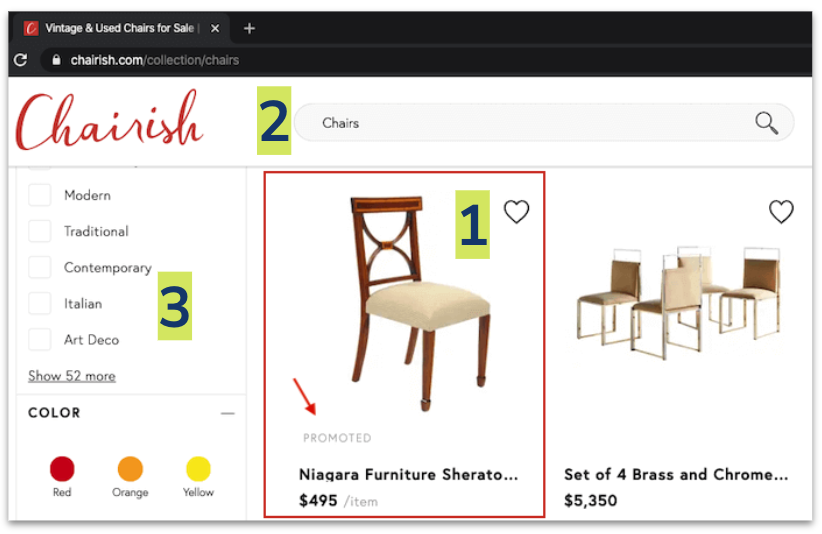
- Sponsored listings match the look and feel of organic content, leading to higher conversion rates as compared to standard display ads. Catalog makes it easy to access a feed of products for ad creation.
- Contextually target based on how the user arrives at the listing results page. Category or search term are the most popular targeting options for sponsored listings. Kevel's keyword targeting is at the center of contextual targeting.
- Ads shouldn’t disrupt the user experience. Ensure relevancy by taking into account user defined preferences with AdQuery.
- Advertisers can compete in a 1st price or 2nd price auction. Optionally, lower barriers to entry for newer advertiser by offering autobid. Autobid allows advertisers to set a targeted return on ad spend (ROAS) goal and automatically adjusts CPC bids to achieve the goal ROAS.
- Correctly attribute sales back to media spend through closed loop attribution.
Check out more examples of sponsored listings.
Targeting granularity, reach, and performance are a balanceAdditional options outside of search term and category targeting can be applied to further refine relevancy and targeting. However, it's important to note that increasing targeting parameters will result in a smaller reach. It's also worth noting that there is a point of diminishing returns in terms of targeting granularity, where advertisers may not achieve the anticipated performance outcomes.
If you would like to move forward with additional relevancy and targeting outside of category and search term, here are some suggested paths forward:
- Demographic targeting: This requires using UserDB to store and retrieve demographics that you provide.
- User segmentation: This requires using UserDB to store and retrieve segments. There is also the option to use Kevel Audience as a more robust segmentation tool.
- When using auctions there are two additional features that can be used to bias the auction:
- Relevancy score: With Kevel's Relevancy Score functionality, you can directly influence the ad selection process in an auction using your own relevancy/quality score data. Kevel then uses your supplied relevancy score data in combination with eCPM number to calculate an Ad Rank, which is used by the Ad Decision Engine to rank ads.
- eCPM partitions: By default auctions will look at the overall performance of an ad for eCPM normalization. By employing eCPM partitions, you can limit performance analysis to a specific ad slot. For instance, if there are two sponsored listing slots on a product search results page, utilizing eCPM partitions allows Kevel's decision engine to evaluate the performance of ads in slot 1 and slot 2 individually, rather than aggregating their performance when calculating eCPM. Check out this video for a walkthrough on how Kevel normalizes CPC and CPA rates to an eCPM.
Additional Ad Formats
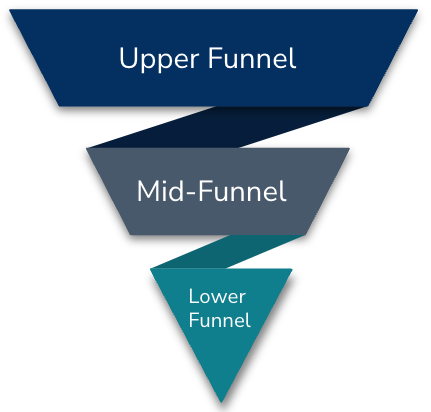
Although sponsored listings serve as an entry point into retail media, incorporating upper funnel and mid-funnel ad formats into your platform offerings sets you apart by providing branding-focused ad units in addition to fulfilling performance advertising needs through sponsored listings. This differentiation enhances your platform's value proposition.
Additional ad format ideas include:
- Banner ads: Standard display ads are time tested and versatile branding and consideration ad format. When paired with a sponsored listing as a companion ad your advertisers can enhance a user's propensity to transact. Find out more about how to create companion ads with Kevel's distribution settings.
- Video ads: Video ads are a powerful brand story telling format, run them as a standalone, with a banner ad, or with sponsored listings.
- Custom units: Creating custom ad units, such as whole page takeovers, audio ads, native ads, or other non-standard formats, can greatly enhance the distinctiveness of your platform. These unique ad units allow your platform to stand out and offer innovative advertising opportunities.
Kevel can serve any ad format and any creative
Kevel's ad decision response returns the ad content that you have stored with Kevel. This can include various formats such as files, JSON, HTML/JavaScript ad code, or reference identifiers to content stored in your own CDN. By handling the creative rendering on your end, this approach minimizes limitations on the types of ads that can be served.
Creative Templates are user-friendly interfaces that enable the creation of custom ads without the need for coding. These templates streamline the information that ad operations needs to input in a format recognized by your server or the webpage/app for rendering.
Kevel Studio simplifies the process of defining this schema as a creative template in a user-friendly manner.
Campaign Management
This section assumes the reader already has background knowledge on how to setup campaigns in Kevel, if Kevel's campaign management is new to you or you would like a refresher, please refer to the the Campaign Management section of the Knowledge Base or the Management API Tutorial.
Catalog for Sponsored Listings
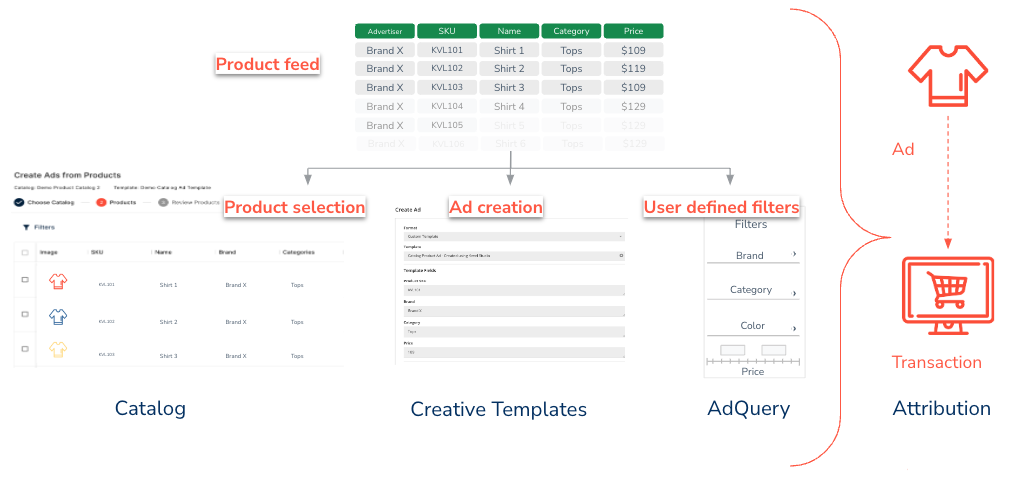
Campaign management in retail media presents unique challenges, particularly in selecting products from a brand's catalog for creating promoted listings with existing organic assets. Kevel's solution is Catalog, which seamlessly links your product inventory to Kevel's platform, eliminating the need for manual duplication and reducing opportunity for user error. By incorporating a product feed into the ad creation workflow, sponsored listings can be easily generated using an up-to-date product list, streamlining the process and ensuring listing accuracy.
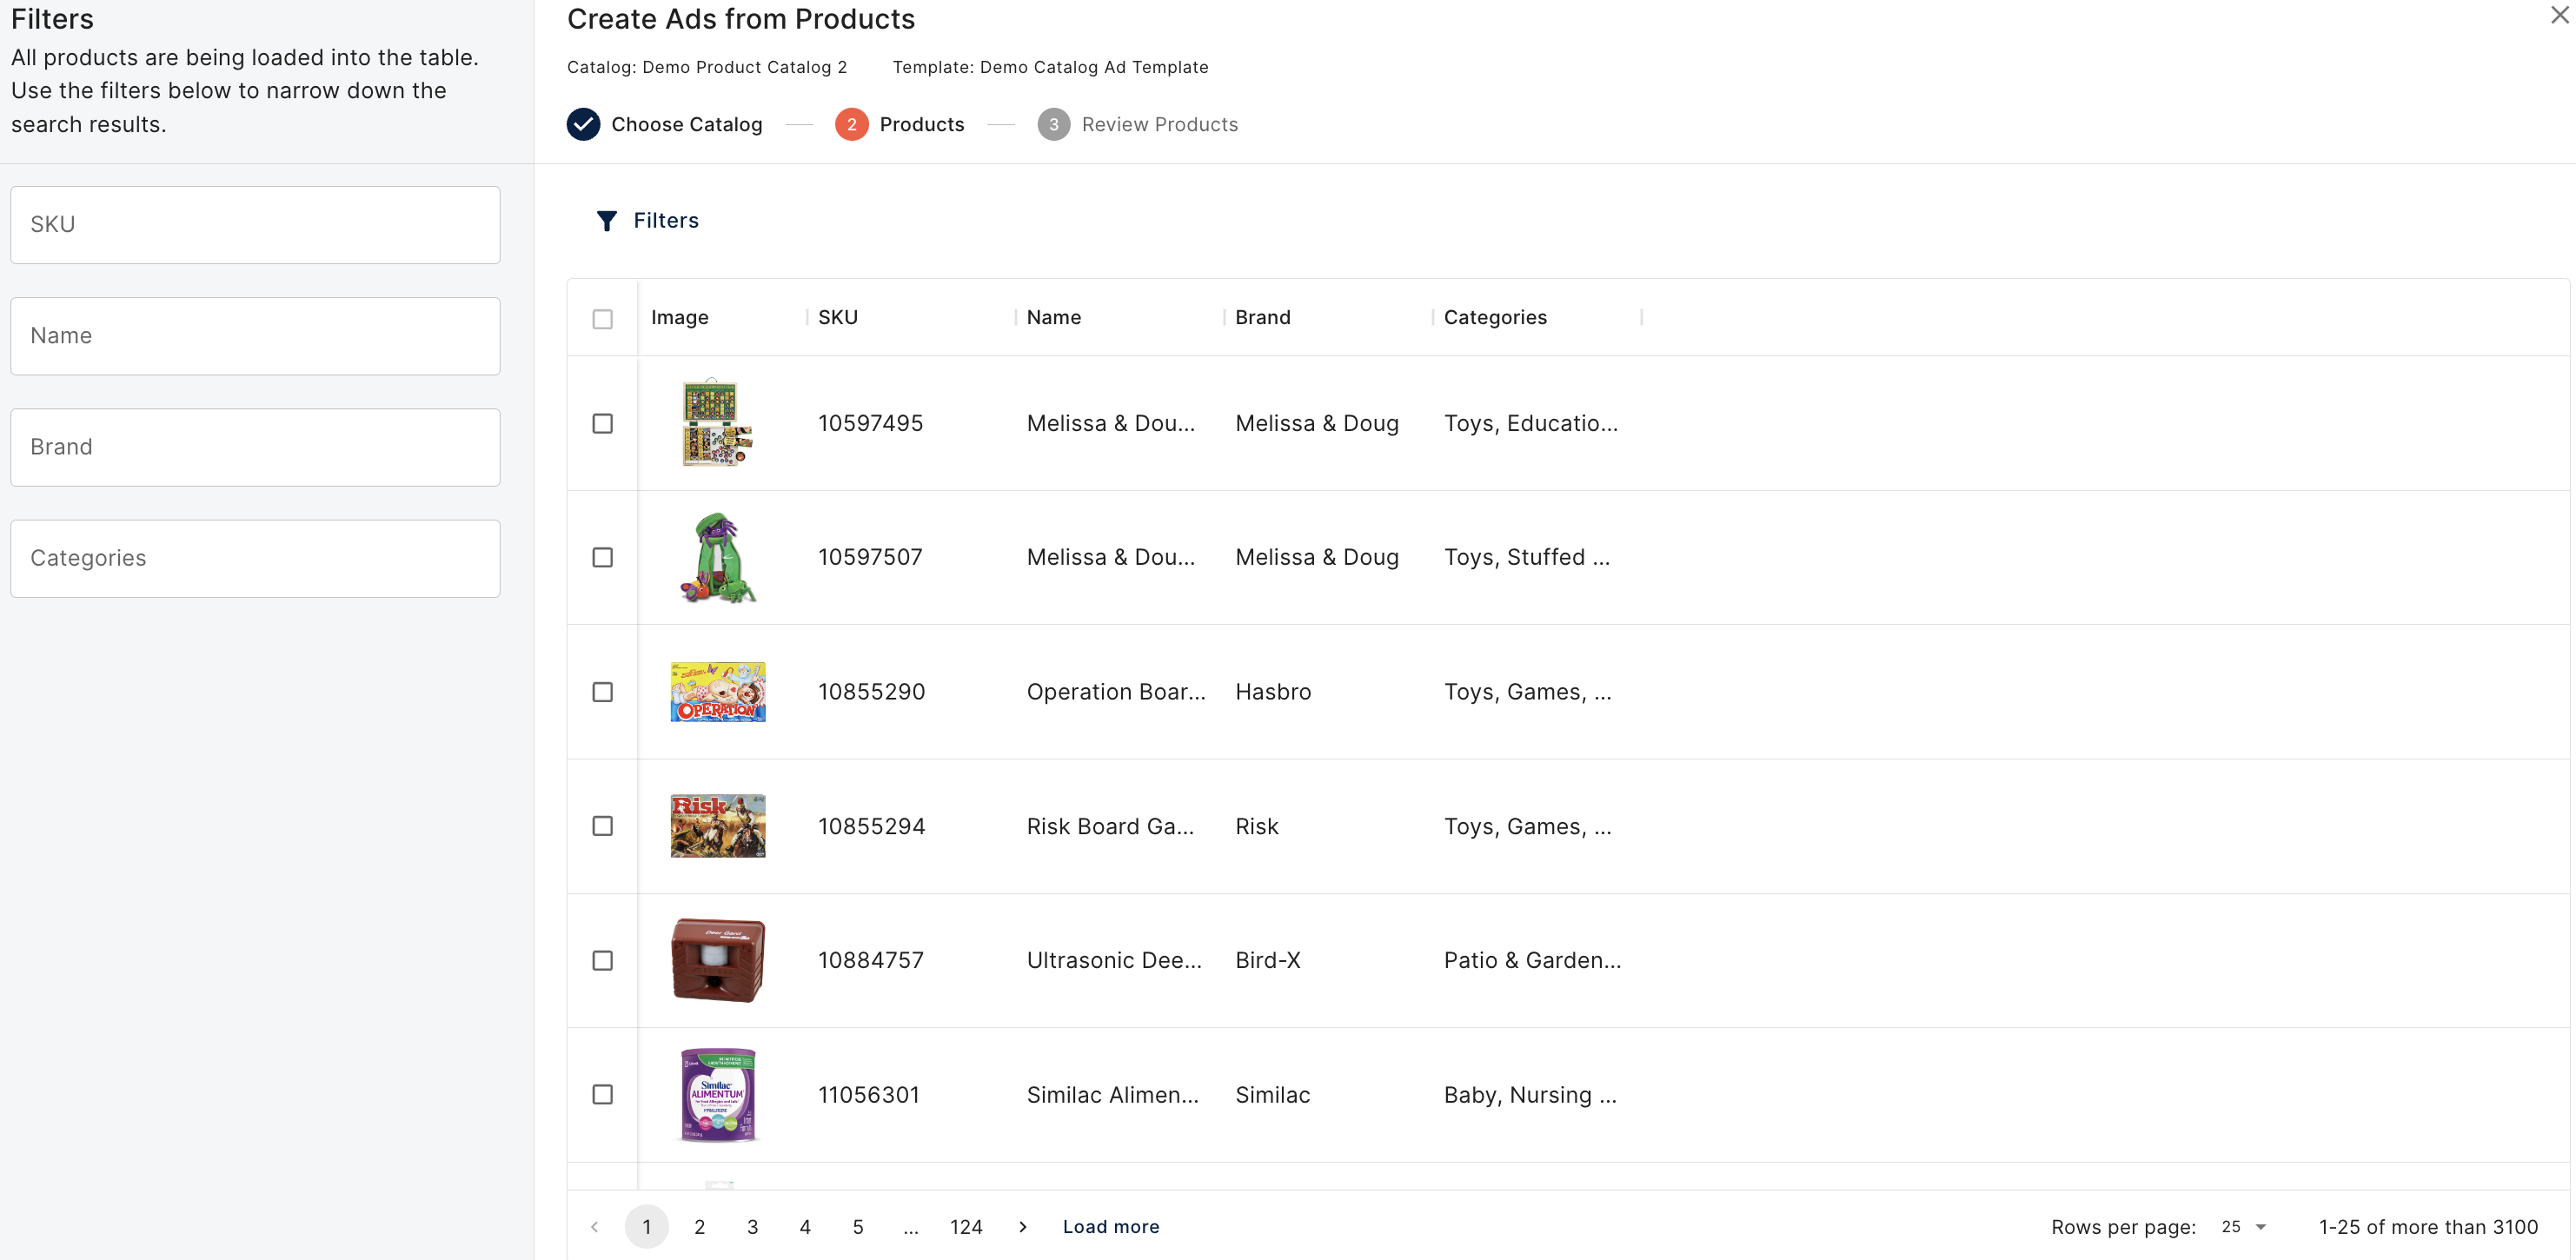
Example product catalog interface
In Catalog, you define the schema for item storageCatalog is agnostic to the type of “items” that fill it. Catalogs may contain consumer packaged goods, retail products, hotel listings, airline routes, professional services providers, articles, blog posts, or anything else. You define the structure and Kevel will index your item feed based on your desired criteria.
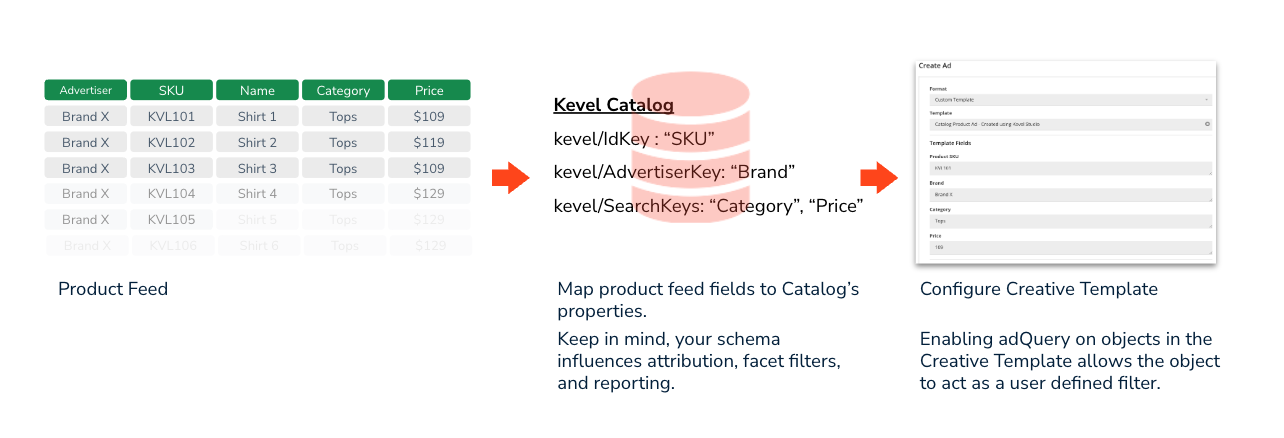
Getting started with Catalog takes a few technical configuration steps and then products can be selected for ad creation and delivery:
- Create the Catalog and define its structure. When creating a Catalog, you define the data structure for items and what attributes are searchable by ad operations users in Kevel's UI.
- Sync your data to Catalog. Data is shared in the NDJSON format via a S3 bucket.
- Link Catalog items to ads through the use of dynamic templates. Catalog Items are linked to Creatives through Creative and Ad Templates, enabling you to establish predefined mappings for different types of Ads and placements based on your specific needs.
- Receive product ads in ad decision responses. When a user visits your website or app, a decision request is sent to Kevel. Kevel then provides a decision response that includes comprehensive data about the ad, including the ad's template content. This template content contains your chosen properties of the associated Catalog item.
Take advantage of Kevel's expert adviceWhen working through your Catalog schema, be sure to work with your Solutions Architect to ensure you've created an optimized schema that takes into account filtering and reporting strategy.
Your Solutions Architect may also need to perform additional internal configurations to ensure that the chosen schema correctly maps to the appropriate fields for reporting attribution.
How you define your Catalog schema will influence attribution reportingKevel attributes at the product (most granular), category, and brand (most general) levels. When defining your schema pay close attention to include following properties:
The unique identifier for your items: This can be a SKU, listing ID, or any identifier tied uniquely to the product that is being promoted. This will inform product level attribution.
One or more categories: A single identifier or array of category names or IDs used for granular ad candidate filtering and attributing conversions at the category level for reporting.
The brand: An identifier for the brand that each item belongs to. Used for brand level attribution.
Once Catalog configuration is complete, creating ads with Catalog can be found as a flight level configuration under the Ads section. Click on the dropdown for Create Ad to see additional options.
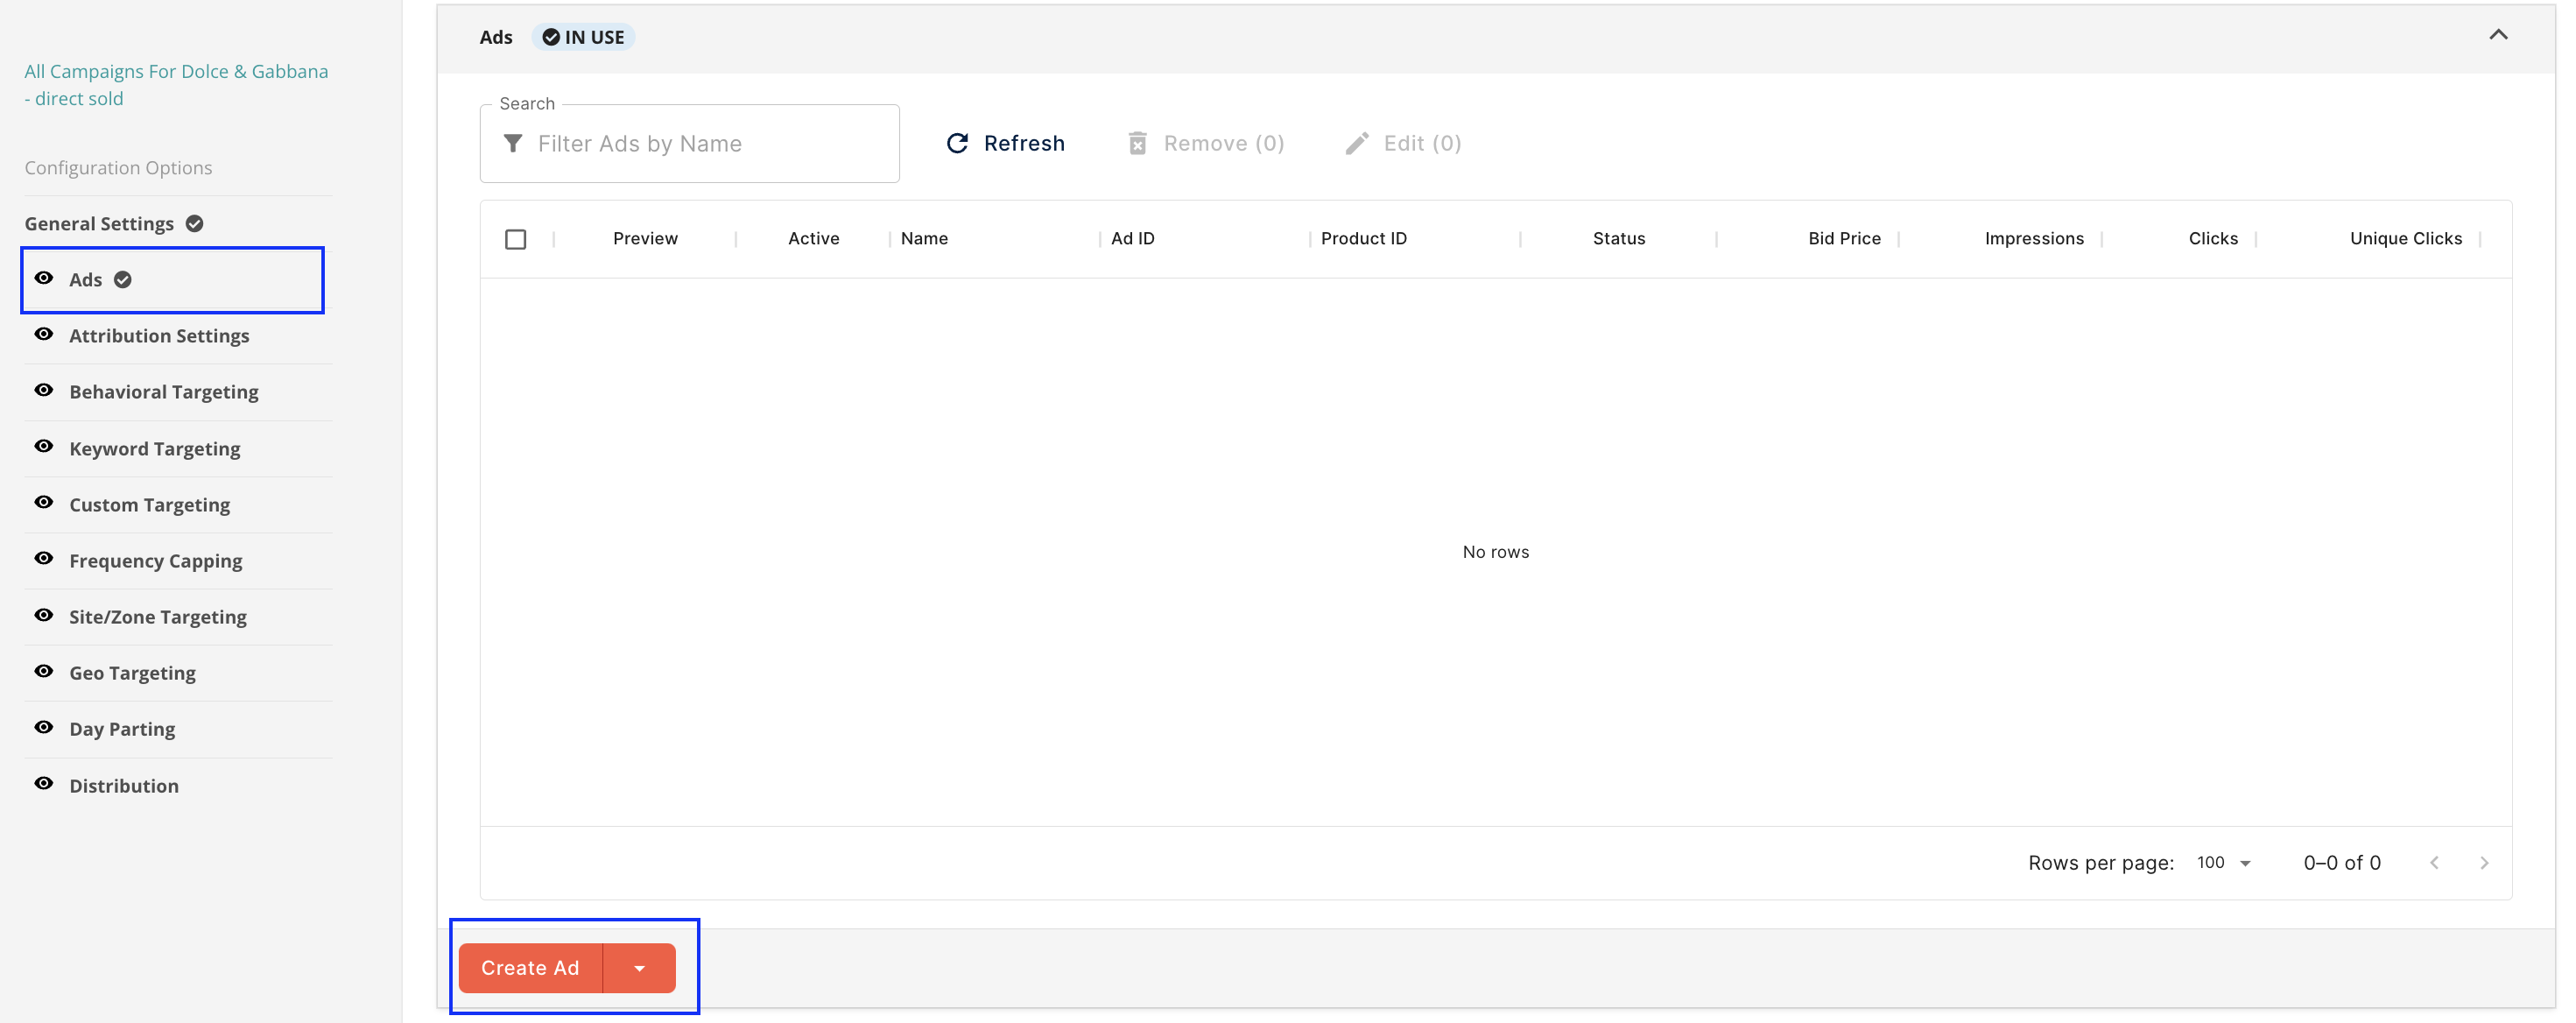
Select Create Ads from Products to access Catalog items.
Follow the prompts for Catalog selection and Ad Template selection and use the filters as needed to find and select the products you would like to create ads with.
Once products are selected and ads are created, the product ad will populate in the Ad panel of the UI.
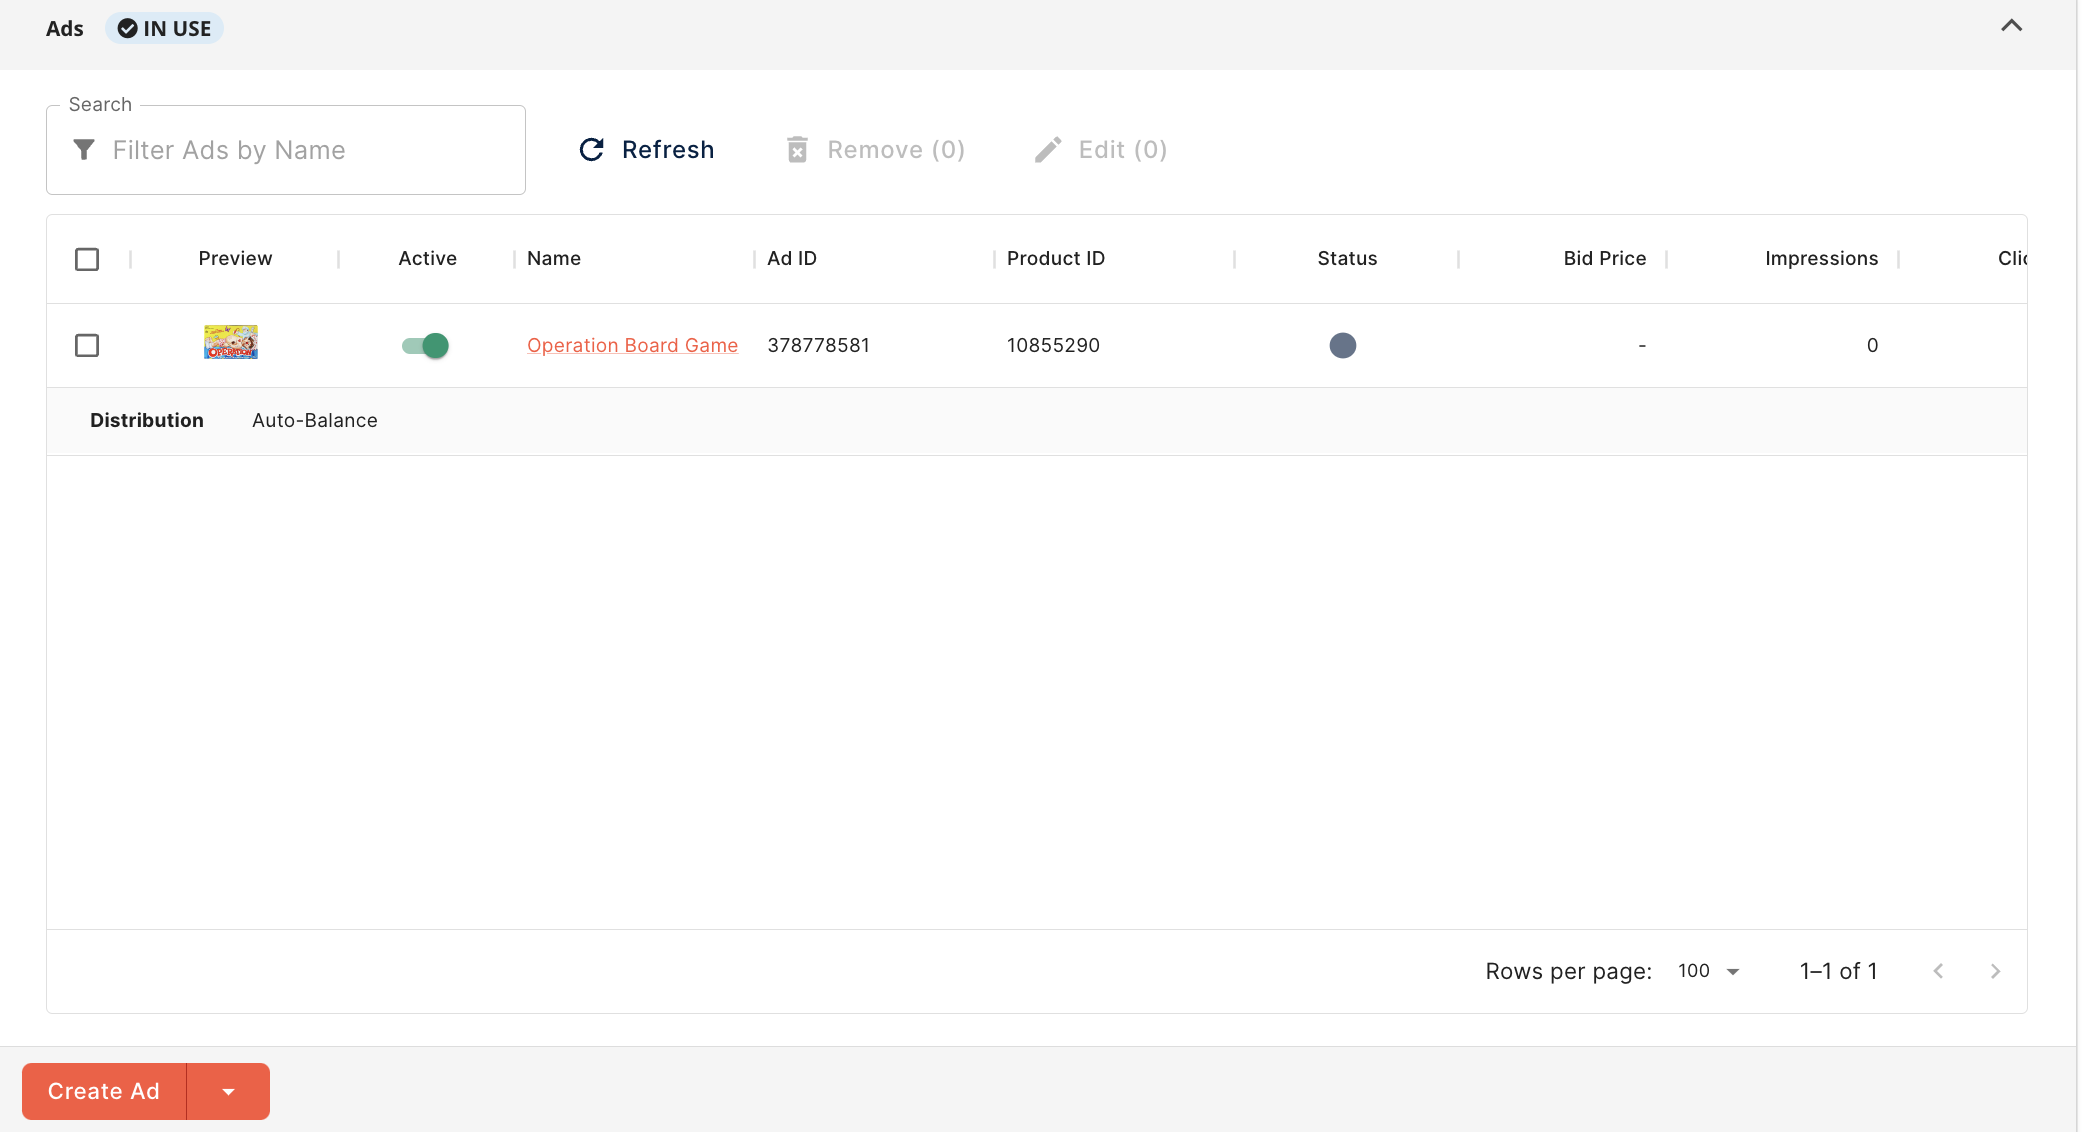
When you click on the ad, you'll see that the Creative Details are automatically filled based on the information set in the Catalog and Ad Template schemas. This automation guarantees accurate product information from the product feed, removing any potential errors that may occur when manually entering the data.

By default flight level settings are applied to ads. However, if you would like to customize specific delivery settings for individual ads, those options are still accessible in the Delivery Settings section underneath the Creative Details section.
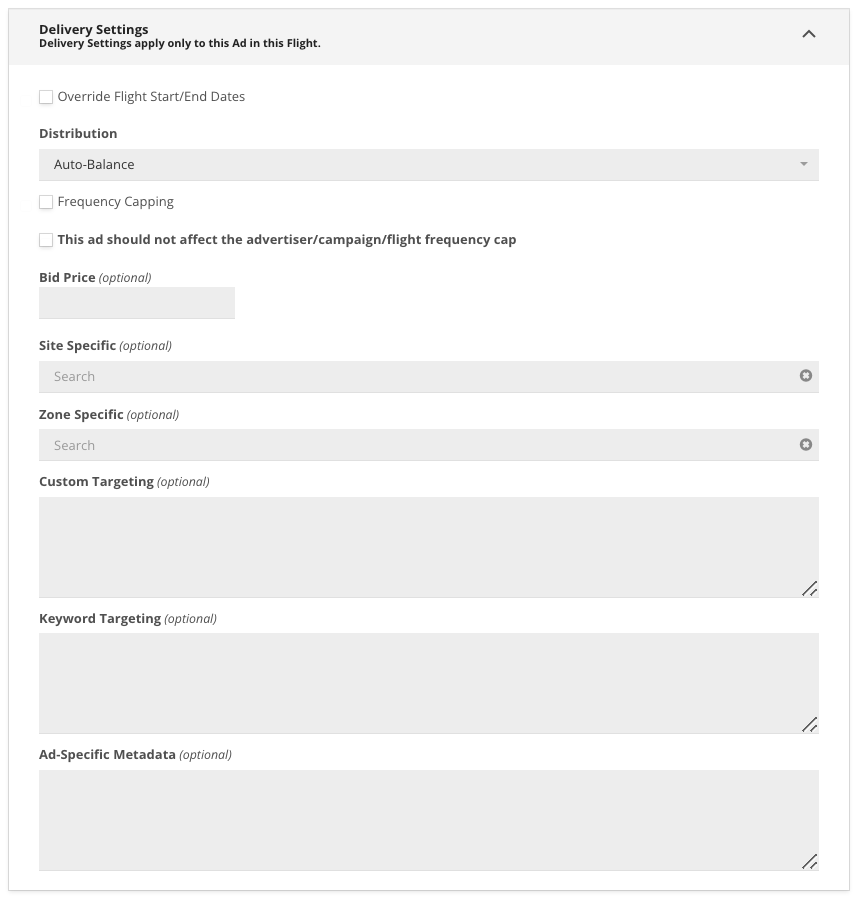
Use cases for overriding Delivery Settings include:
- A group of products may share the same budget that is set at the flight level, however, each individual product may have different bid prices.
- Targeted keywords for specific products can differ from other products selected in the same flight.
AdQuery for Facet Filters
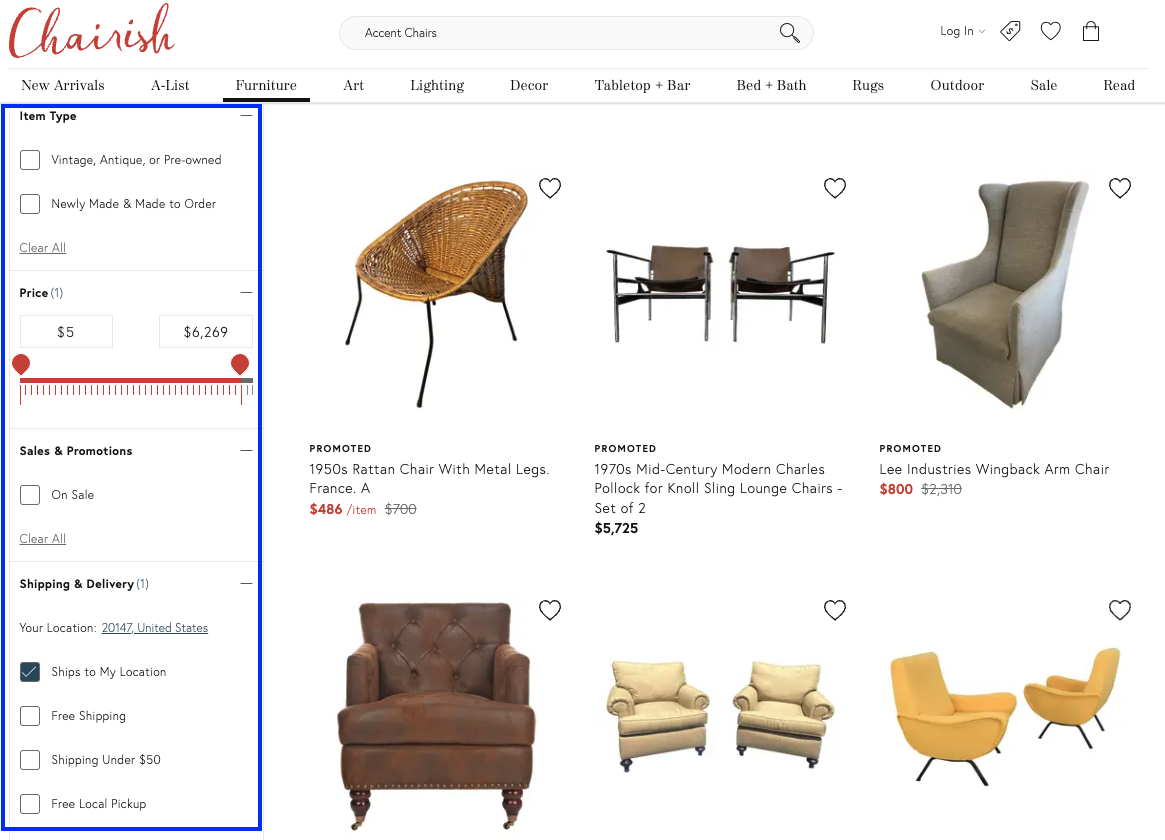
Retail sites often provide users with additional filters to refine their search and reduce organic listings based on user defined relevancy. These filters can include price ranges, item types, colors, and more. However, a poor user experience fails to consider these filters when determining which sponsored listing to display. Kevel's AdQuery feature, on the other hand, takes into account the user's selected preferences to ensure the most suitable sponsored listing is presented.
To utilize AdQuery as a filter for user-defined preferences, there are two steps to keep in mind:
- Determine which facet filters should be included to filter on. These facets need to be included the the product feed supplied to Catalog.
- When creating a Creative Template, include a field for each facet you wish to filter on. An Ad Template will then be configured to map the appropriate product attributes to the Creative Template fields. Creative Templates can be managed through the Creative Template API or through Kevel Studio. At this time, Ad Templates are configured by Solutions Architects and Kevel Support. This step ensures Kevel's Ad Decision Engine has access to the necessary information to effectively filter and decision on.
Attribution
Directly attribute media spend to transaction is the core of retail media. Utilizing Catalog unlocks Kevel's attribution settings.
Kevel offers last-touch attribution, which means that we assign 100% attribution credit to either the last impression or the last click that occurs before a conversion takes place. For more information about Kevel's attribution logic, visit our page on Attribution.
Kevel’s attribution logic takes 4 main criteria into consideration:Attribution is determined based on user, engagement (click or view), match type (same product, same category, same brand), and attribution window (1, 7, 14, 30 days).
Attribution settings can be selected in the UI or via the Management API.
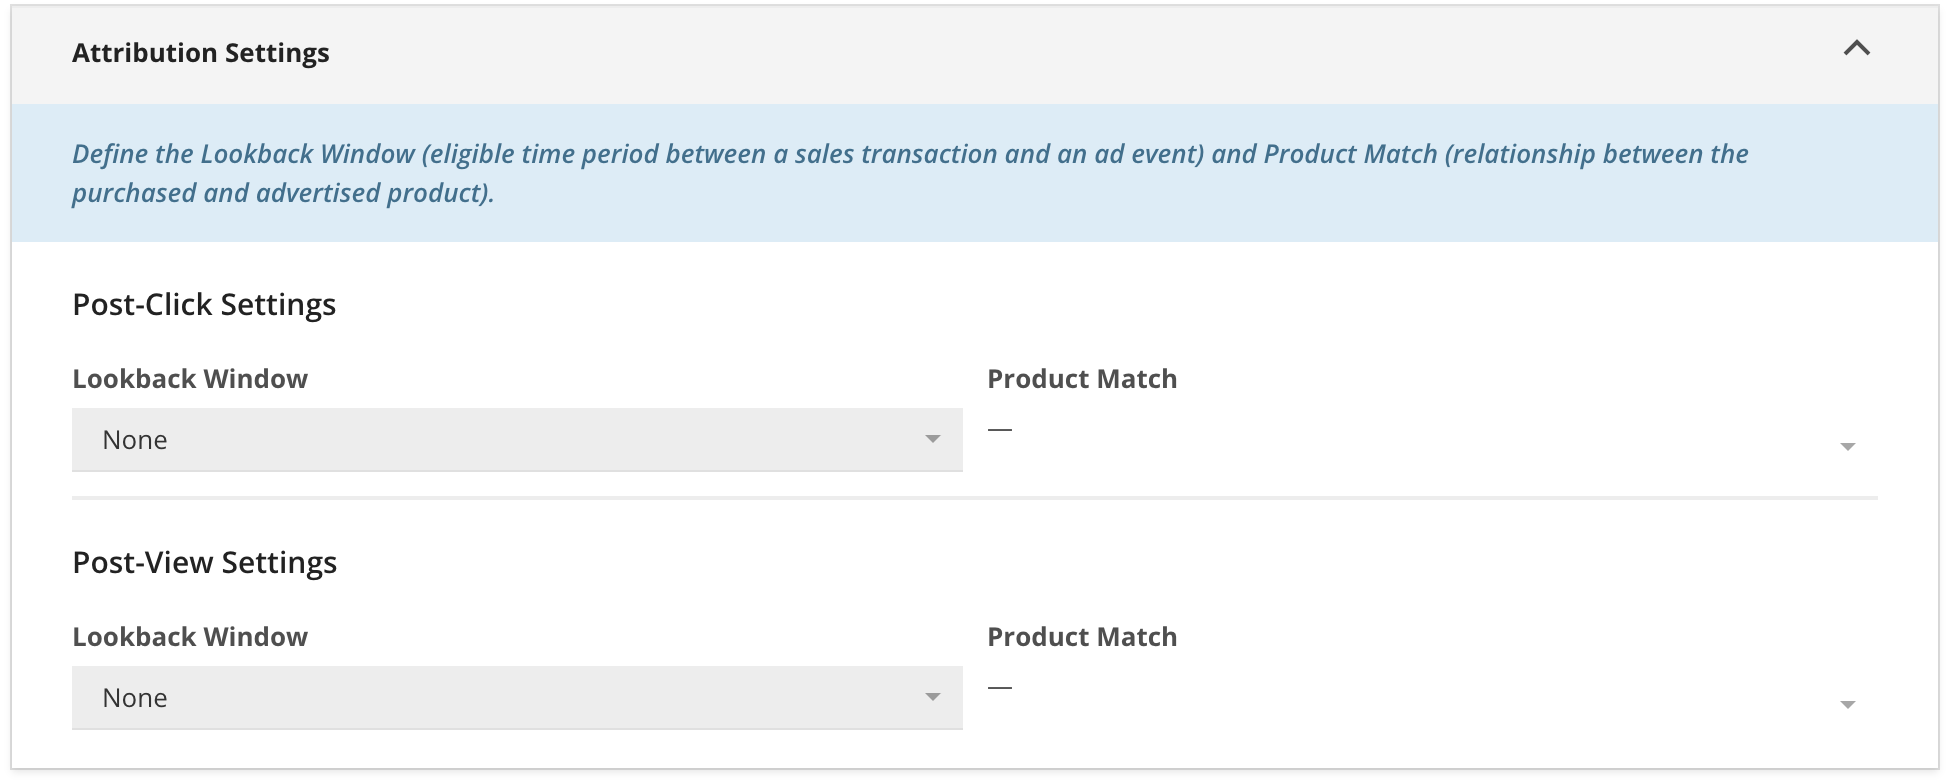
Product match type use casesSame Product: Ensures that conversions are only counted when the exact product being promoted is purchased by the end user. This is helpful when advertisers want to focus on promoting a specific product without including similar products or measuring any indirect effects.
Same Category & Brand: Same category attribution is valuable when promoted products have minor differences, such as size or color.
Same Brand: Beneficial for advertisers who want to promote specific items while also tracking the impact of their ads on brand awareness. It works well when advertisers aim to sell more of their products in general, along with the specific items being promoted.
Lookback windows
- Longer attribution windows are appropriate for consideration-intensive purchases and complex sales cycles, where customers require more time for research and decision-making.
- Shorter attribution windows are suitable for impulse buys, time-sensitive promotions, and high-frequency purchases, where the purchase decisions are made quickly or are influenced by immediate marketing efforts.
- The choice of attribution window length should align with product characteristics, customer journey, and campaign objectives.
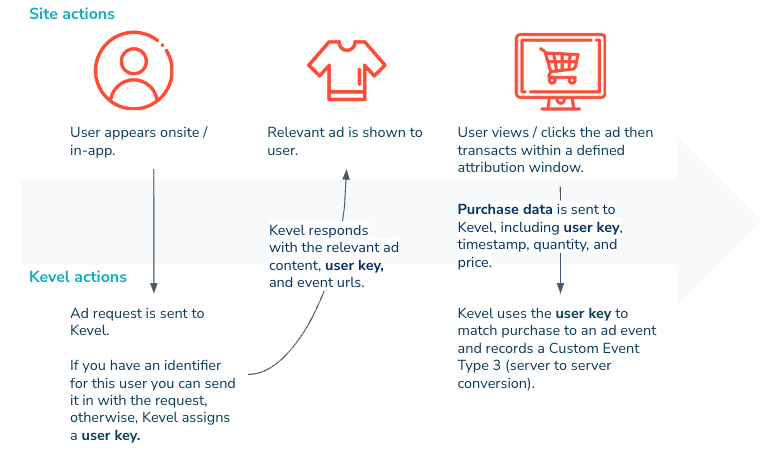
Attribution flow
In addition to Catalog, there are two other factors that need to be accounted for before taking advantage of attribution reporting:
User Key
To attribute a conversion to a paid media campaign, it is essential to have a persistent unique identifier that can connect a user's interaction with an ad (view and/or click event) to a purchase event.
To store user keys, you can utilize UserDB, Kevel's first party data store. If you have your own identifier for a recognized user at the time of the ad request, you can use that as the user key, otherwise, Kevel will assign one to the user. Whether you are providing your own identifier or using Kevel's auto generated, it must be present at time of ad event and sent back to Kevel as part of the purchase stream.
Purchase Data Stream
In order to log purchase data with Kevel, you will need to send a server side event for each purchase completed. This purchase data is what Kevel uses to confirm a transaction has occurred and compare user transactions with user impression or click events.
You will send a GET request to a network-specific endpoint following this format, where 123 is the Kevel network ID:
https://e-123.adzerk.net/c/123/purchase
The following parameters are required for any attribution set up:
userKey_
timestamp (ISO 8601 (eg. 2017-01-19T16:27:20.974Z) but we also support unix epoch time)_
quantity _
price_
Additionally, you can also send LTV related information on each event, namely:
ltvQuantity: the expected additional quantity of items sold to this customer. As a Retailer, you can decide to send the quantity of the particular item in the line item, or it can be representative of the prorated future number of total items expected to be purchased by the customer
ltvValue: the expected additional sales value sold to this customer. As a Retailer can decide to send the sales value for the specific product in the line item or it can be representative of the prorated future value expected to be spent by the customer
Additional product information to be used on your attribution scheme and reporting needs can be provided via Kevel Catalog. For example, a retail marketplace company may complement product information with fields such as:
Product details
Product identifier
Brand identifier
Main category identifier
Learn more about how Kevel handles attribution.
User AttributionKevel's attribution attributes GMV to ad campaigns, for user level attribution, consider using Kevel Audience to assist in identity resolution and customer lifetime value tracking. See this page for more information.
Ad Decisioning
If Kevel's approach to ad decisioning is new to you, read more about our Ad Decision Engine.
Below is a high level diagram for reference:
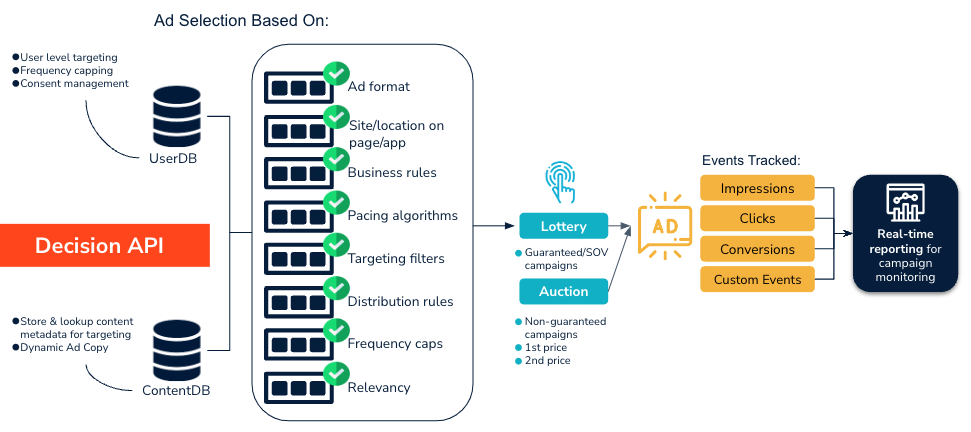
Did you know you can manage multiple demand sources and business rules within Kevel?Kevel handles three types of user experience when it comes to media buying:
- Advertiser Self Serve
- Managed Direct Demand
- Via Programmatic Partners
Whether you decide on one buying experience or all three, you can create different business rules and manage each demand sources all within Kevel.
Using Kevel's priorities, you can define rules that govern how each demand source competes for inventory. Priorities act as a mechanism for Kevel to honor specific requirements and deliver ads according to the defined rules, guaranteeing the desired ad sequencing and maximizing the effectiveness of your advertising strategy. Learn more about priorities.
At Kevel, priorities are established as part of inventory management and can be chosen when creating ads flights.
Auctions
Auctions facilitate the buying and selling of ad inventory by allowing advertisers to bid on available impressions, clicks, or conversions. Unlike traditional fixed-price models, auctions create a market-driven pricing system where advertisers determine the value of the inventory through their bids. This approach optimizes the efficiency and effectiveness of the buying process, ensuring fair competition and allowing advertisers to align their bids with their desired outcomes.
Kevel provides the flexibility to choose between first price and second price auctions, allowing you to select your preferred auction type.
With first price auctions, the highest bidder pays the exact amount they bid, while in second price auctions, the highest bidder pays just one cent more than the second-highest bid.
This gives you the control to determine the auction strategy that aligns best with your strategy.
eCPM NormalizationKevel employs a normalization process to ensure that bids based on different rate types, such as flat rate, CPM, CPC, or CPA, can compete fairly in the same auction. Normalizing rates into an expected CPM (eCPM) takes performance (CTR or CVR) into consideration, which allows Kevel to optimize for the CPC and CPA flights that generate the most revenue to win the auction instead of competing solely on their price.
CPC flights use their performance to calculate eCPM
eCPM = CPC x (Clicks / Impressions) x 1000CPA flights use their performance to calculate eCPM
eCPM = CPA x (Conversions / Impressions) x 1000
Autobid
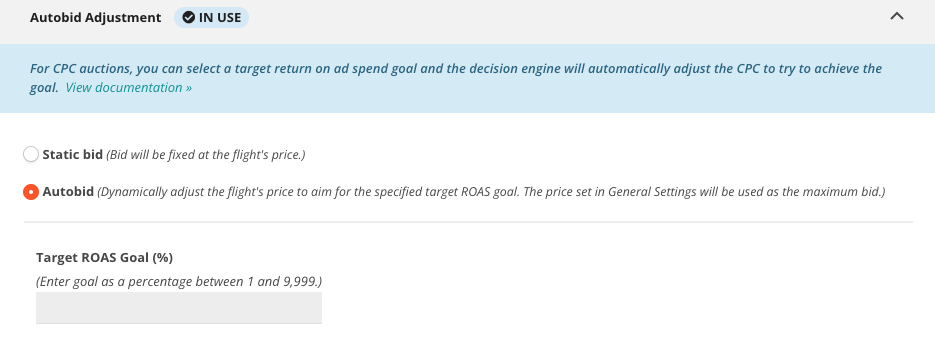
Take the guesswork out of bidding in your ad platform with Kevel's Autobid feature. Advertisers often have a specific goal in mind for their campaign's success, but may struggle to determine the optimal bid. With Autobid, advertisers can simply input their desired return on ad spend (ROAS) goal and maximum CPC bid. Our advanced ad decision engine takes care of the rest, automatically adjusting the CPC bid to optimize towards achieving the target ROAS.
Reporting
By setting up Catalog you gain access to retail media specific reporting metrics. This extends the functionality of standard reporting by adding additional product-specific group bys.
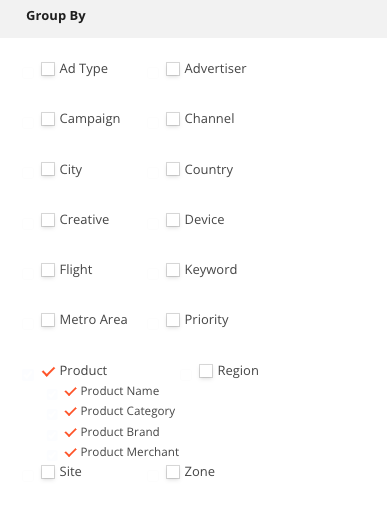
In addition to the product specific groupings, and in additional to providing insights on impressions, clicks, click-through rate, GMV, and ROAS, retail media reporting offers attribution insights with the following additional columns:
| Property | Details |
|---|---|
| Purchases | Total ad attributed purchases |
| Post-Click Purchases | Purchases that were proceeded by a click as the last touch |
| Post-View Purchases | Purchases that were proceeded by an impression as the last touch |
| Same Product Purchases | Items purchased are an exact match with items promoted |
| Same Category Purchases | Items purchased are from the same Brand and Category as the promoted items |
| Same Brand Purchases | Items purchased are the same Brand as the promoted items |
Note:When grouping by products, some custom event metrics such as Viewable Impressions may not display.
Updated 2 months ago
