Customization
Beta productThis product is currently in beta. It may not be available to all Kevel customers, and features described may change before the product is generally available.
When setting up your self-serve tool, your Kevel account team will ask for information to help make the tool consistent with your brand's look and feel, your preferences about what data to expose to your advertisers, and your business rules for creating campaigns.
This includes the following general settings about accessing your Self-serve tool.
General settings
Kevel network name & ID
The name and ID of the Kevel network that should be associated with this Self-serve tool.
URL subdomain
Your self-serve tool will be built at [URL-subdomain].campaign-dashboard.com. Choose the subdomain of your choice.
CNAME
If you'd like, your self-serve tool can appear within a subdomain of your URL, such as ads.yourwebsite.com. To configure this, contact your Kevel CSM.
The configuration steps for a custom subdomain are as follows:
- Provide the CNAME where you want your advertisers to access your Self-serve UI. For example,
ads.yourwebsite.com - Kevel will create a hosted zone for that subdomain and will provide you with the name server (NS) hostnames
- Within your DNS service, create the NS record for the subdomain (i.e.
ads.yourwebsite.com) within your parent domain (i.e.yourcompany.com) and set the provided name servers as its value - Kevel will create a record within the hosted zone pointing to your Self-serve UI
Note that emails – such as user invitation emails and password resets – will still come from [URL-subdomain].campaign-dashboard.com.
Advertiser catalog access
If your advertisers will use your self-serve tool to pick products to promote as a part of sponsored listings campaigns, then you will need to specify which IDs in your product catalog will be used to define advertiser catalog access.
The available options are:
- Brand ID
- Merchant ID
- Both Brand and Merchant ID
When adding an advertiser to self-serve, you will specify the brand and/or merchant IDs associated with the advertiser. Users within that advertiser will only be able to view and promote items from your catalog that carry the ID(s) associated with their advertiser.
Time zone
Pick a single time zone for your self-serve UI. Available time zones are listed here. This time zone will:
- Apply to all advertiser users, regardless of their location
- Affect date cutoffs for
- ing metrics
Note that this time zone will not affect start and end dates for campaigns created via self serve; these are defined via the campaign template's background settings.
Currency
Pick a single currency for your self-serve UI. This should be the same currency you use throughout all of your Kevel implementation. This currency will:
- Apply to all advertiser users, regardless of their location.
- Be used to display all currency-related values on dashboard and report pages.
Earliest query date
Optionally, you can pick a date before which advertisers will not be able to pull data. This is useful if your Kevel data only goes back to a certain time, or if data has been cleaned only up to a certain past date.
External link
Optionally, you can include a link for advertisers to access in the nav bar of your self-serve UI. This could be, for example, a link to your support page or another merchant portal.
If you'd like to include an external link, provide a URL and link name. The link name will be exposed to advertiser in the nav bar.
Performance metrics
Select among the following performance metrics to display to advertisers in tables and line graphs. We recommend including all metrics. Impressions and clicks must be included.
- Impressions
- Clicks
- Conversions (Requires tracking server-to-server conversions using event type 3)
- CTR (click-through rate)
- Spend (equivalent to Revenue in Kevel)
- CPC (cost per click)
- CPM (cost per thousand impressions)
- CVR (conversion rate. Requires tracking server-to-server conversions using event type 3)
- Orders (equivalent to GMV in Kevel. Requires tracking GMV)
- ROAS (Requires tracking GMV
Optionally, you can also specify different lists of metrics for campaigns, flights, and ads. For example, you could choose to include Orders and ROAS when showing flight data, but exclude those metrics in connection to specific ads.
You may also choose to rename metrics as they appear to advertisers. For example, you could rename "Orders" to "Purchases".
Callout metrics
Select which of 3 metrics to display on the dashboard and individual campaign reports.
- Impressions, clicks, and CTR (click-through rate) - best for top-of-funnel and awareness campaigns
- Impressions, clicks, and ROAS (return on ad spend) - best for bottom-of-funnel campaigns
Reports page
Choose whether or not to include a reports page. The reports page enables your advertisers to see and export reports about performance on campaigns.
Category report
If the reports page is enabled, you can also choose to include a category report. The category report enables your advertisers to see and export reports about performance broken down by product category.
The category report requires use of Kevel Catalog.
Campaign-specific metrics
If you choose to include campaign creation functionality in your Self-serve tool, you may wish to show advertisers a different set of reporting metrics for the campaigns they create via Self-serve.
If so, you can specify the following for each type of campaign your Self-serve tool supports:
- Performance metrics
- Callout metrics
Campaign template
With sponsored listings campaigns, advertisers select products to promote from your product catalog and target search keywords. By choosing a budget and with a CPC bid or maximum bid or selecting a ROAS goal for automatic bidding, they are able to participate in a 1st or 2nd priced auction to compete for visibility among your sponsored listings placements.
When setting up your self-serve tool with sponsored listings campaign creation, your Kevel account team will work with you to understand your preferences for a series of settings.
In Kevel Self-serve, you can configure a single campaign type, or set up multiple different types of campaigns from which advertisers may choose when creating a campaign. Each of these campaign types is called a "campaign template."
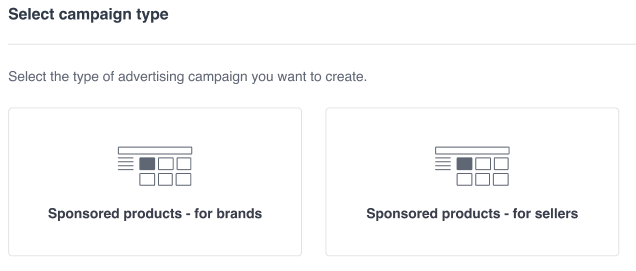
By creating multiple campaign templates for Kevel Self-serve, you can enable your advertisers to select from different campaign types with different settings.
Background settings
These settings are never exposed to your advertiser.
Priority ID
Provide Kevel with the name and ID of the priority to be used when advertisers create sponsored listings campaigns in self-serve. All self-serve campaigns will use the same priority.
The priority must have an auction selection method. First and second pricing are both accepted.
Time zone
Pick a time zone for all flights created with this campaign template. Available time zones are listed here. Learn more about the effect of setting time zones on a flight here.
Product catalog table ID
The ID of the catalog table you want advertisers to select from when choosing which products to promote. Your Kevel CSM can help you identify this.
Note that the catalog must include the parameters listed in the technical requirements section.
Category catalog table ID (optional)
If you want advertisers to be able to filter the product table by category when selecting products to promote within a campaign.
Ad template table ID & ad template ID
An Ad Template is a set of mappings that correlate properties of Catalog items to Ad and Creative attributes. Your Kevel CSM can help you identify your ad template's ID and table ID.
Learn more details here: Linking Catalog Items to Ads
Attribution settings (optional)
Optionally, you can choose attribution settings that will be applied to all campaigns created by advertisers using your self-serve tool. Learn more at Kevel Attribution.
You can configure the following lookback windows and match types:
- Post-click lookback window: None, 1 day, 7 days, 14 days, or 30 days
- Post-click match type: Same product (SKU match), Same Category & Brand, Same Brand, or Same Merchant
- Post-view lookback window: None, 1 day, 7 days, 14 days, or 30 days
- Post-view match type: Same product (SKU match), Same Category & Brand, Same Brand, or Same Merchant
In addition, you can choose to enable ad-level attribution. Campaign templates support the following types of ad attribution:
- On - Campaigns made with this template will accept a set of "attributable items” for ads, in the same structure as the Management API. (Advertiser API only, native ads only)
- Set in background - Campaigns made with this template will automatically set attributable items based on the advertiser’s catalog access settings. Choose brand ID, merchant ID, or both.
eCPM settings (optional)
By default, eCPM optimization uses Kevel's default recommended settings, which you can find on the Setting up an Auction page.
Optionally, you can specify different eCPM settings to be used with all campaigns created by advertisers using your self-serve tool. These are:
- Optimization time frame
- eCPM multiplier
- Floor eCPM
- Ceiling eCPM
Burn-in settings (optional)
By default, Kevel's default recommended burn-in settings are used. You can find these on the Setting up an Auction page.
Optionally, you can specify different settings for
- Default eCPM
- Burn-in impressions
Ad frequency caps (optional)
Optionally, you can choose to set ad frequency caps for all ads on campaign created with this campaign template.
If enabled, you will specify:
- FreqCap
- FreqCapDuration
- FreqCapType
Campaign creation steps
When advertisers create sponsored listings campaigns in your Self-serve tool, they will navigate through a set of predefined steps.
You may choose to set up multiple campaign templates with different settings available. This enables you to offer advertisers the ability to configure different types of campaigns with distinct options on each type.
The following section explains your options for customization in each of these steps.
1 - Campaign Setup
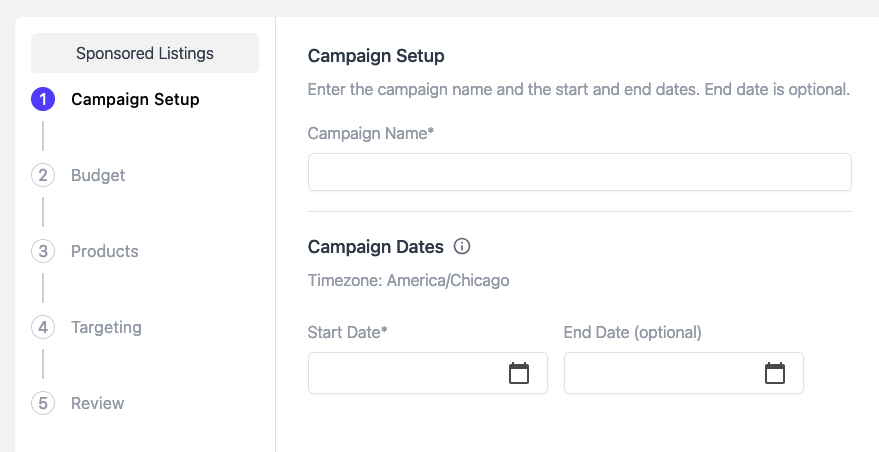
Step name and description
You can customize the name and description of this step.
By default, the step name is "Campaign Setup" and the description is "Enter the campaign name and the start and end dates. All fields are required."
End date required?
Choose whether or not advertisers will be required to set an end date on their campaigns.
Minimum campaign duration
Optionally, choose a minimum number of days that an advertiser's campaign must last. For example, some publishers choose to enforce a campaign duration of at least 30 days.
Error message
You can customize the error message an advertiser receives if fields are not filled out as required.
By default, the error message is "Campaign Name is required. Start and End Dates must span 30 days or more."

2 - Budget

Step name and description
You can customize the name and description of this step.
By default, the step name is "Budget" and the description is "Select a daily or total budget. Choose your CPC (cost per click) for the campaign."
Auction type
If your auction uses first pricing, then this step will request a CPC (cost per click).
If your auction uses second pricing, then this step will request a maximum CPC.
Budget types
Choose whether to enable your advertisers to set a daily, monthly, and/or total budget.
If you enable more than 1 budget type on a campaign template, then advertisers will choose their budget type on each campaign.
Bid types
Choose whether to enable your advertisers to bid manually, use Autobid, or pick between the two.
- In a manual bid campaign, advertisers will specify a CPC bid (for a first-priced auction) or a maximum CPC bid (for a second-priced auction)
- In an autobid campaign, advertisers will specify a ROAS percentage goal and a maximum CPC bid.

Autobid campaigns require tracking GMV and ROAS with Kevel.
Minimum CPC
Optionally, you can select a minimum CPC. By default, the minimum is $0.01.
Minimum budget
Optionally, you can require minimum budget amounts. By default, the minimum daily budget is $20 and the minimum total budget is $100.
Minimum & maximum ROAS
If you enable automatic bids on your campaign template, you can also specify a minimum and maximum ROAS value that advertisers to select.
- Smallest possible minimum ROAS: 0.01 (1%)
- Largest possible maximum ROAS: 99.99 (9,999%)
Error message
You can customize the error message an advertiser receives if fields are not filled out as required.
By default, the error message is "CPC must be $0.01 or higher and daily budget must be $20 or higher or total budget must be $100 or higher."

3 - Products
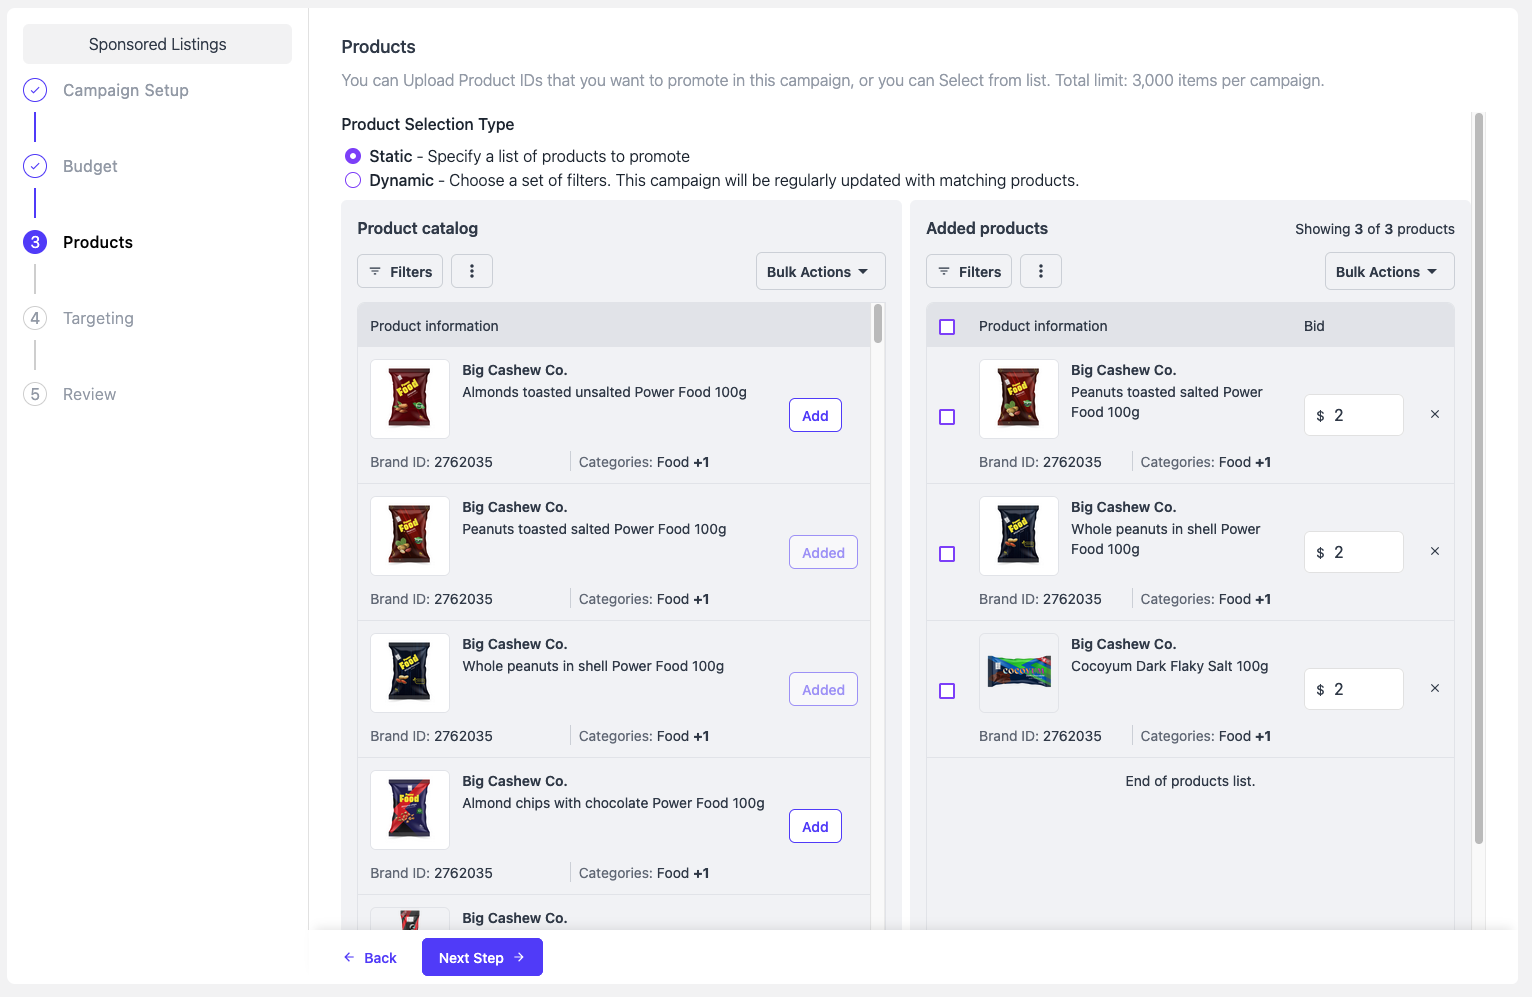
Step name and description
You can customize the name and description of this step.
By default, the step name is "Products" and the description is "You can Upload Product IDs that you want to promote in this campaign, or you can Select from list. Total limit: 3,000 items per campaign."
Product attributes & filters
You can customize what product attributes appear to advertisers, as well as which of those attributes are available as filters. See self-serve catalog requirements for details.
Static or dynamic product selection
You can choose whether to offer your advertisers one or both of the following product selection methods:
- Static product selection - The advertisers specifies a set list of products to promote.
- Dynamic product selection - The advertiser chooses a set of filters. The resulting campaign will be regularly updated with matching products as your catalog updates.
Number of products
Optionally, you can select a minimum and/or maximum number of products that an advertiser can promote on a single campaign.
The default minimum is 1, and the default maximum is 3000. Note that Kevel's system maximum is 3000 products per campaign.
Product bids
You can choose to enable or disable product-specific bids.
Error message
You can customize the error message an advertiser receives if an incorrect number of products are selected, for static product selection only.
By default, the error message is "At least one product is required."
4 - Targeting (optional)

Including a targeting step is optional. You may choose to omit this step if you prefer not to offer a search keyword targeting option to your advertisers.
Step name and description
You can customize the name of this step.
By default, the step name is "Targeting."
Keyword targeting
You can choose whether or not to allow your advertisers to add keywords to their campaign for targeting. This is commonly used for search keyword targeting.
Note that keywords will be added to the flight using "OR" operator logic. For more details, see Keyword Logic.
Keyword targeting name & description
If you choose to use keyword targeting, then you can customize the name and description of this field.
By default, the name is "Keyword" and the description is "Select search terms your users will find your ad(s) by."
Bid modifiers
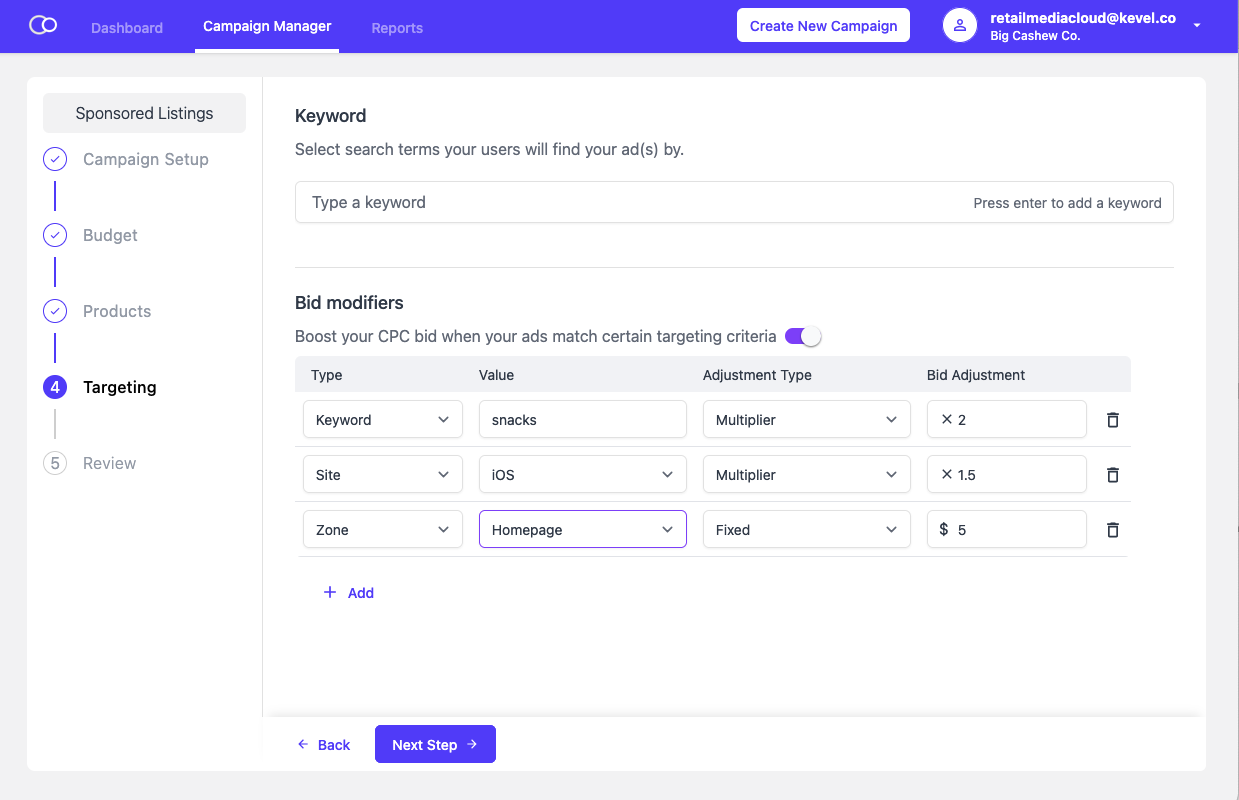
You can choose whether or not to allow your advertisers to add bid modifiers to their campaign.
Bid modification types
You can choose to enable advertisers to include the following types of bid modifiers:
- Keyword
- Site
- Zone
In addition, you can rename any of those parameters. For example, if you use sites for device types, you could rename "site" to "device."
Bid adjustment types
You can choose to allow advertisers to set fixed bids, multipliers, or both for their bid modifiers.
Optimization insights
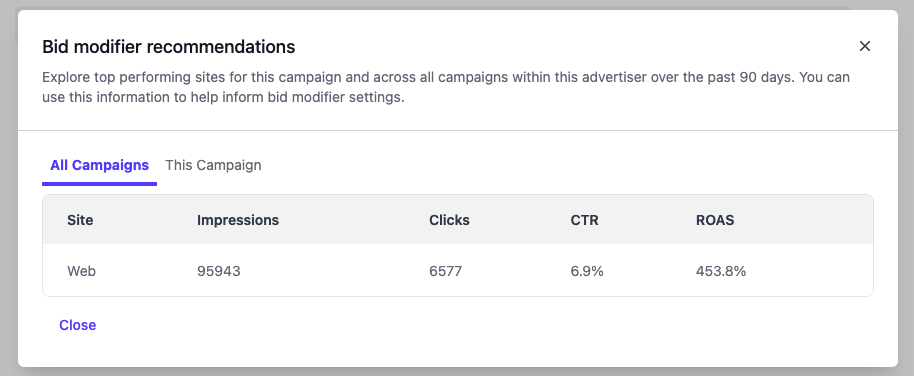
If site bid modifiers are enabled, then you can choose to enable advertisers to view their top performing sites when setting a campaign template.
When enabled, advertisers setting bid modifiers will be able to click "see data insights" to see a list of their top 10 performing sites for all campaigns and this campaign, along with impression, click, CTR, and ROAS data.
5 - Review
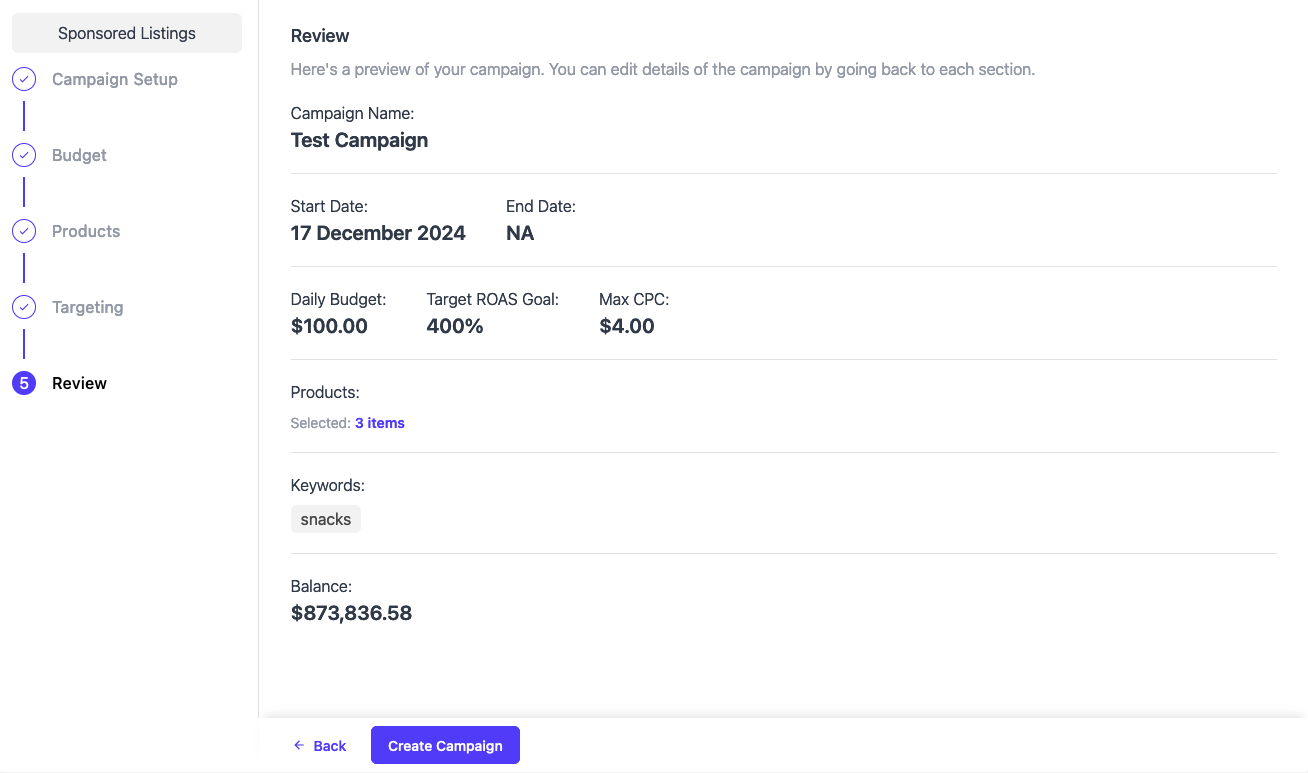
Step name and description
You can customize the name and description of this step.
By default, the step name is "Review" and the description is "Here's a preview of your ad. You can edit details of the campaign by going back to each section."
Updated 5 months ago
