
Ad Server SSO
Set up SSO for your media owner users with SAML 2.0 or OpenID Connect, and understand how provisioning, sessions and access removal behave.
Ad Server SSO lets your users sign in with your identity provider (IdP) instead of a Kevel-issued username and password. Kevel supports SAML 2.0 and OpenID Connect.
It covers anyone signing in to the Ad Server directly, and media owners who reach it through the "Log in as media owner" link on the Kevel Console sign-in page. See Console sign-in paths.
How SSO works step-by-step in Ad Server
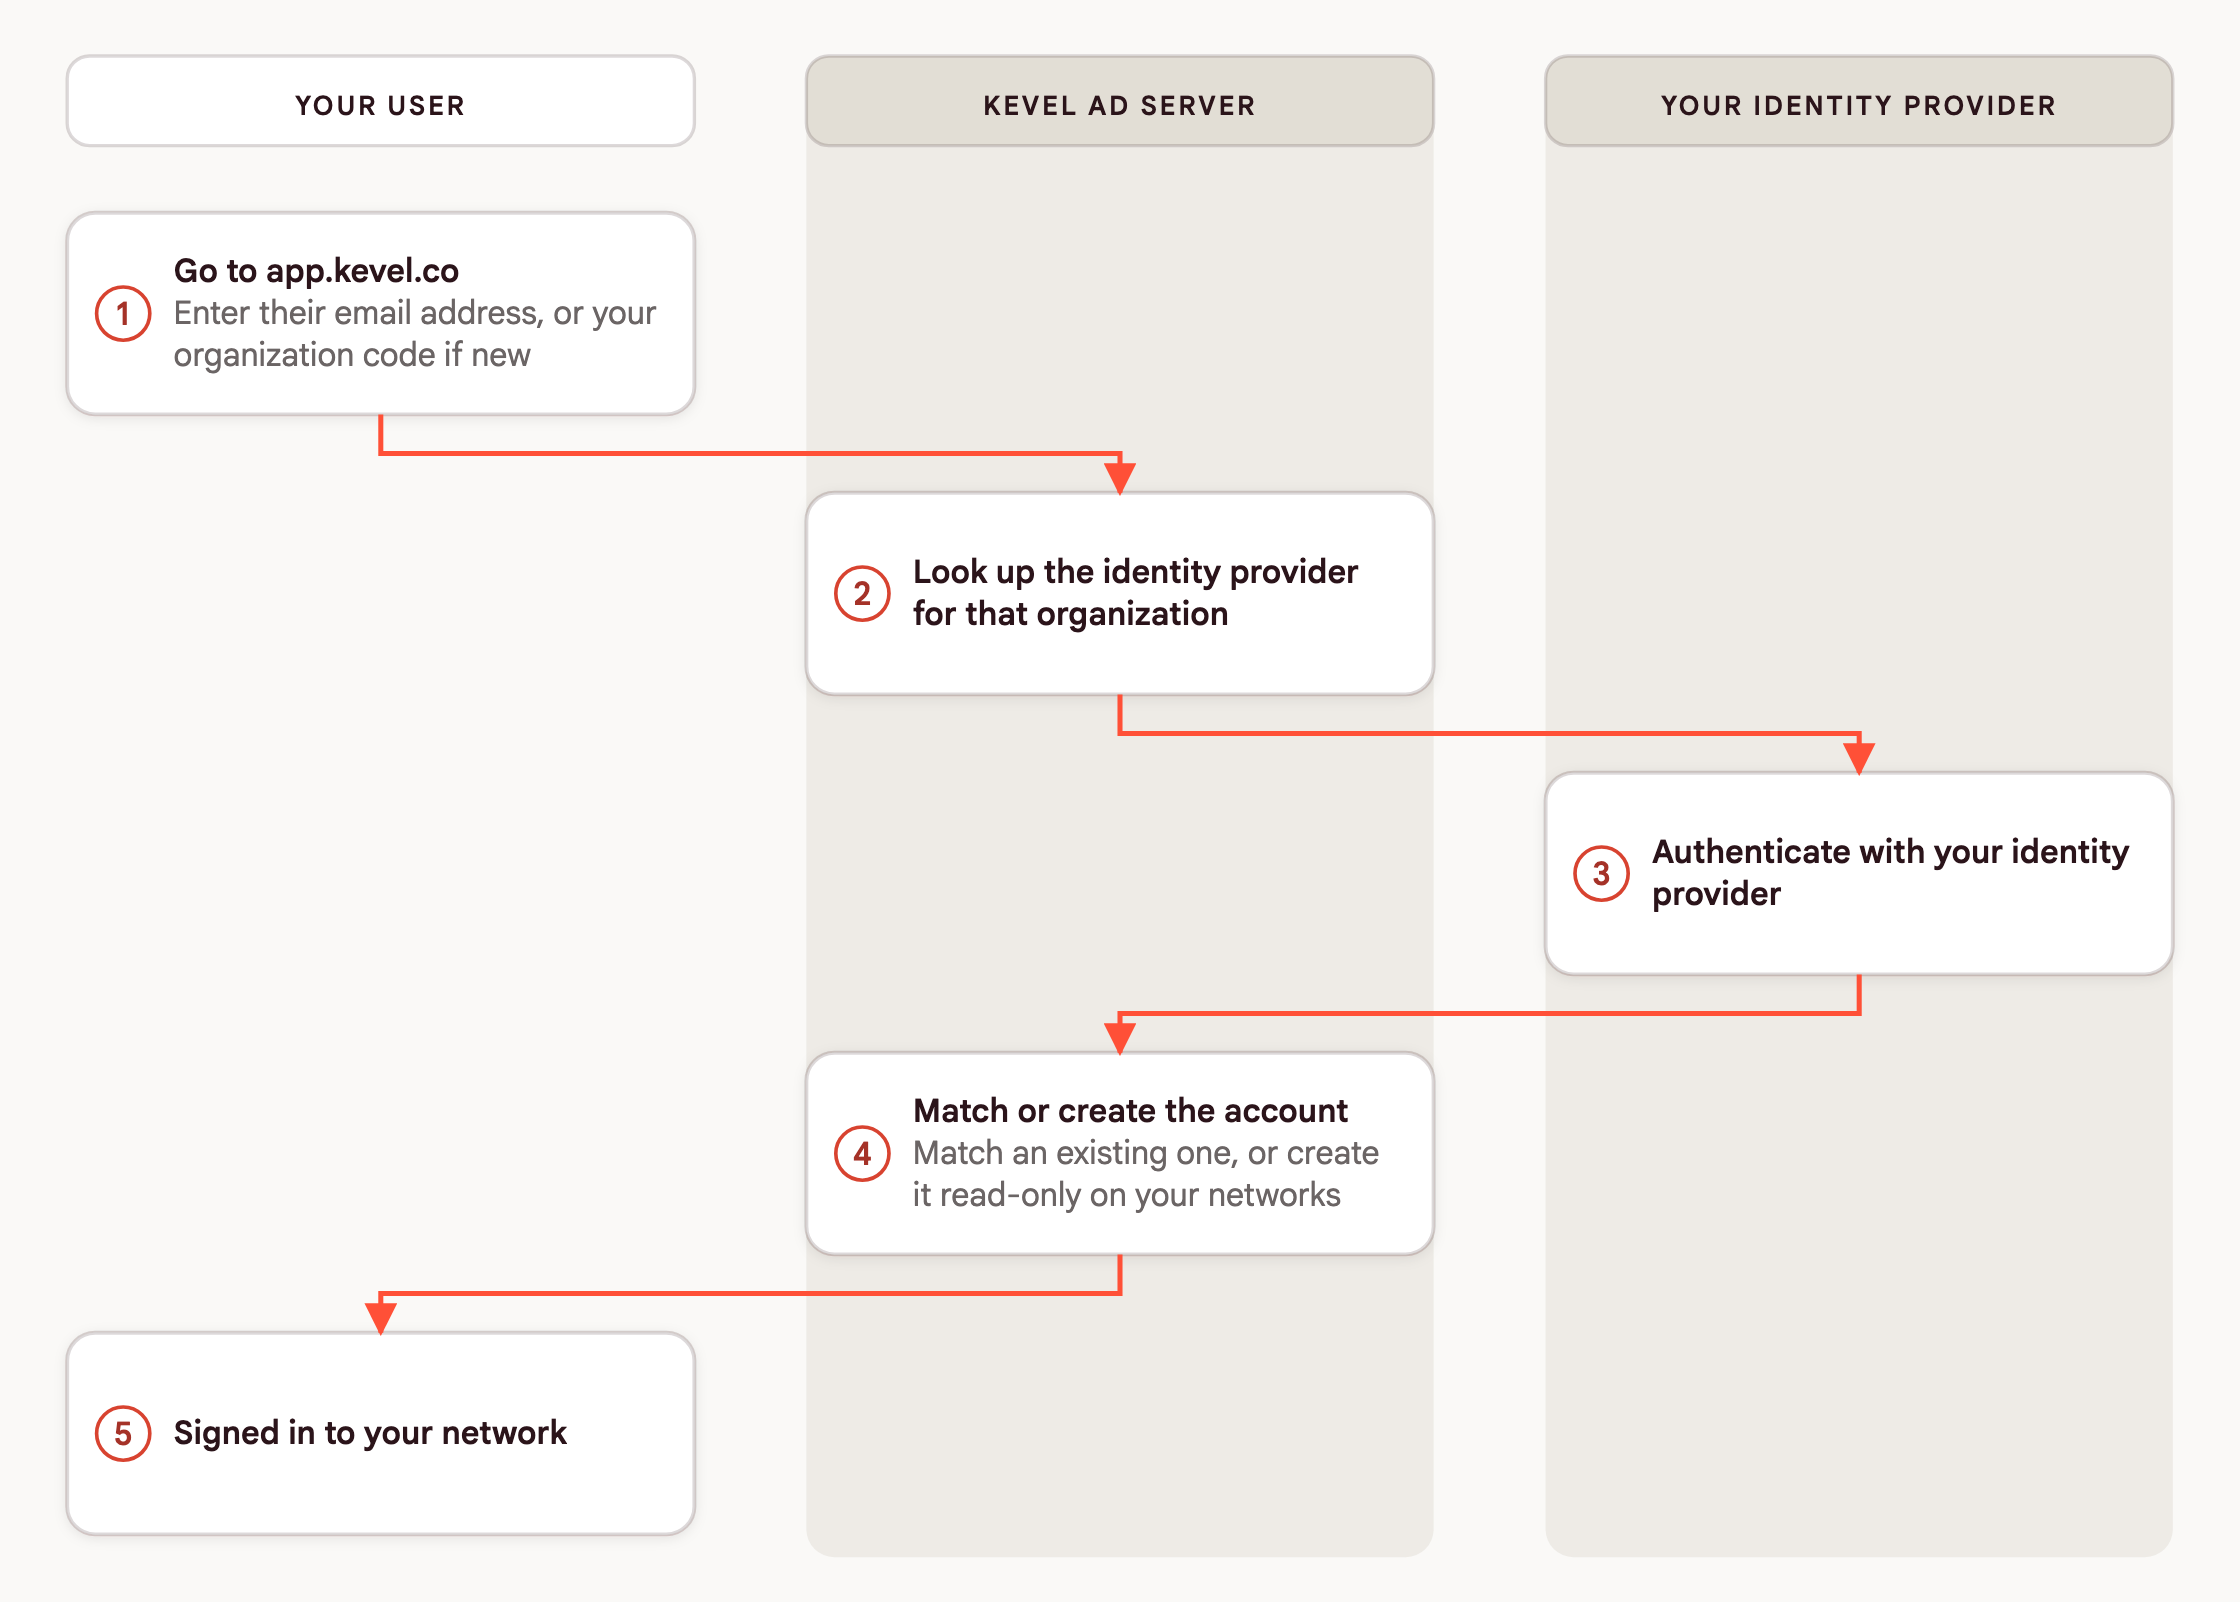
Sign-in starts at app.kevel.co. Kevel identifies the organization from the email address entered, or from your organization code, and routes the sign-in to the identity provider configured for that organization. Once your IdP confirms the identity, Kevel completes sign-in. After a first successful sign-in, the identity provider is remembered in that browser and later sign-ins route straight through to it.
Sign-in is service provider (SP)-initiated: it always starts at Kevel, and your IdP redirects back once authentication completes. Starting sign-in from your IdP's own application dashboard is outside this integration.
SSO establishes identity only. Roles, permissions, and network access are set in the Kevel UI, not in your IdP or SAML assertion.
First-time sign-in
Routing by email address depends on an existing Kevel account, so it does not resolve an identity provider on a first sign-in. Your organization code identifies the organization in that case: Kevel uses it to find your identity provider, and creates the account once your IdP confirms the identity. See Provisioning new users.
A sign-in link carrying your organization code applies the code automatically. Where an unrecognized email address is submitted, the sign-in page offers Enter your organization code instead.
Starting sign-in from your IdP
Kevel does not support IdP-initiated sign-on. Your users cannot click the Kevel tile on their IdP dashboard to start authentication. They sign in at your organization's sign-in URL instead:
https://app.kevel.co/?orgcode=yourorgcode
Your organization code is generally the name of your organization. Ask your Kevel account manager if you are not sure what yours is.
Where your IdP supports a bookmark or secure web authentication (SWA) app, you can give users a tile that works:
- Hide the tile for the Kevel SAML SSO app itself, so nobody starts from there.
- Create a bookmark or SWA app pointing at your organization's sign-in URL above.
- Assign that bookmark to the same users and groups assigned to the Kevel SAML app.
Integration steps
Your Kevel contact guides you through setup. Use this section to prepare what your IdP admin needs in advance.
Prerequisites
Gather the following before starting:
- Your chosen integration method: SAML 2.0 or OpenID Connect.
- For SAML: a metadata document endpoint URL, publicly accessible from the internet. Your identity provider's own documentation describes where to find it. Kevel stores only this URL and reads the document dynamically, so a rotated signing certificate needs no change on the Kevel side while the URL stays the same. Send Kevel a new URL only if the URL itself changes.
- For OpenID Connect: an issuer URL (typically ending
/.well-known/openid-configuration), a client ID, and a client secret. - The network ID(s), if any, that new users should reach automatically on first sign-in. See Provisioning new users.
- One identity provider for your whole organization. Kevel supports one IdP per organization, with no separate IdPs for development and production and no binding of an IdP to a single network. Use group assignment in your IdP to control who is admitted.
- One email address per Kevel organization. A person who needs access to two Kevel organizations needs a different email address for the second.
- A plan to switch everyone at once. SSO replaces Kevel password sign-in for the whole organization, with no per-user opt-out, so you cannot roll it out in phases.
Where to find your metadata document, for the most common identity providers:
| Identity provider | Where to find the metadata document |
|---|---|
| Microsoft Active Directory Federation Services (AD FS) | At https://your-server-name/FederationMetadata/2007-06/FederationMetadata.xml |
| Okta | Once Kevel is configured as an application, open it in the Okta admin dashboard, select the Sign On section, and look under the SAML settings for "Identity Provider metadata". The URL looks like https://your-domain-prefix.okta.com/app/application-id/sso/saml/metadata |
| Auth0 | In the Auth0 dashboard choose Clients, then Settings, then Show Advanced Settings, and look for your SAML Metadata URL. It looks like https://your-domain-prefix.auth0.com/samlp/metadata/your-auth0-client-id |
How setup runs
1. You send Kevel your identity provider details. The metadata document URL for SAML 2.0, or the issuer URL, client ID, and client secret for OpenID Connect.
2. Kevel configures an identity provider entry, registers your organization against it, and confirms the values to enter in your IdP. For SAML 2.0 these are:
- SAML 2.0 POST binding endpoint (ACS URL):
https://auth.kevel.co/saml2/idpresponse - SP URN / Audience URI / SP Entity ID:
urn:amazon:cognito:sp:us-east-1_Ml1DytqrI
Some Kevel deployments may use a different endpoint pair and a different attribute mapping, including sending the email address as the SAML NameID. Ask your Solution Architect when you begin integrating.
3. You create the app or integration in your IdP using those values, and map the attributes Kevel reads to identify each user.
For SAML 2.0, provide attribute values for email and name, using these attribute names:
http://schemas.xmlsoap.org/ws/2005/05/identity/claims/emailaddresshttp://schemas.xmlsoap.org/ws/2005/05/identity/claims/name
Both attributes are required. Kevel uses their values to create the user with the same email address and name.
For OpenID Connect, Kevel reads the claims email, name and sub, and maps sub to the username.
Kevel logo. If your Kevel app or integration should have a logo, download the Kevel logo here.
4. You confirm the test sign-in URL Kevel sends reaches your IdP correctly. A correct setup returns a message saying authentication was successful and to contact Kevel to finish setup.
5. Kevel enables the integration for your organization. This happens only after you confirm the test works, which keeps a misconfiguration from reaching users who can already sign in today.
One thing to check on your side: your IdP needs to allow these users into the Kevel application at all. For most providers that means assigning the intended users or groups to the Kevel app you created in step 3.
Common errors
| What you see | Likely cause |
|---|---|
| Redirected to Kevel with a generic sign-in error, after your IdP confirmed authentication | The email or organization association Kevel expects does not match what your IdP sent. Check the email attribute mapping, and see Provisioning new users if this is a brand-new user. Use the attribute names exactly as listed in step 3. Shorter names, such as email and name, are not accepted. |
| Your IdP rejects the connection, or shows a certificate or audience mismatch | The ACS URL or SP Entity ID in your IdP does not match what Kevel sent. Check both against the values from step 2. |
| Authentication succeeds but the user cannot reach any network | No default networks are configured for a first-time user. See Provisioning new users. |
Go-live checklist
- Existing users' email addresses match between Kevel and your IdP
- Default network access is configured for first-time users, or you have confirmed none is needed
- The test sign-in URL reaches your IdP and returns you to Kevel signed in
- Kevel has confirmed the integration is enabled for your organization
How SSO behaves day to day
Provisioning new users
Where your organization has just-in-time (JIT) provisioning enabled, Kevel creates an account the first time an identity signs in through your IdP. It applies to every identity your IdP admits to the Kevel application.
The email address comes from your IdP's assertion, and it is lowercased before matching. Kevel signs in the existing account with that address, or creates one where none exists. A new account gets read-only access to your organization's default networks, across every Kevel product enabled on those networks. If network A is a default network with both the ad server and Console enabled, the new account gets read-only access to network A in both.
Decide your default networks before your first SSO sign-in. They give a first-time user somewhere to land. Set them to the networks a new user should reach on day one, or set none if you would rather grant access deliberately. With none set, sign-in still completes, but the account has no access and shows a sign-in error until an admin grants it a network in the Kevel UI.
Three further things to know:
- Defaults apply only to accounts created by signing in for the first time. A user added through the Kevel UI gets exactly the access specified on the invitation, and nothing on top of it.
- Defaults apply at the moment the account is created. Adding a default network later does not reach accounts already provisioned, so grant those in the Kevel UI.
- Access granted this way is read-only. Raise an account's access level in the Kevel UI once it exists.
Where the address in your IdP differs from the one already held in Kevel, that sign-in creates a second read-only account instead of reaching the original. Confirm that addresses match before go-live, so existing access and history stay intact.
Session behavior
A Kevel session lasts up to 12 hours from sign-in, or 6 hours of inactivity, whichever comes first. Those two limits are what end a session.
Access is not frozen for that long. The Kevel UI re-reads the signed-in user's access every 30 seconds. A change you make in Kevel, including deactivating a user or changing their access level, takes effect within about half a minute. The user does not need to sign out and back in.
That refresh reads Kevel's own record of the user. It does not ask your IdP anything. Kevel confirms identity with your IdP at sign-in and does not contact it again during the session. Removing a user in your IdP therefore does not end their session or revoke their access on its own. Their next sign-in goes back through your IdP, and an identity your IdP no longer admits cannot get in.
For offboarding, deactivate the user in Kevel as part of the same step that removes them from your IdP.
Removing access
To remove a user's access, deactivate them in the Kevel UI: go to Settings > Manage Users and use the toggle next to their name.
Deactivation takes effect within about 30 seconds, the interval at which the UI re-reads each user's access. The user is signed out and cannot sign back in.
Where the user was listed as a salesperson on any campaigns, their name stays on those campaigns. To restore access, reactivate the user rather than deleting and re-creating them.
Updated 20 days ago