
Merchant & ROPO reporting
Merchant reporting breaks down a Campaign's attributed purchases by the Merchant recorded on each purchase — the Purchased Merchant. It appears as a table widget in a Campaign's stats drawer, listing each Merchant alongside the purchased line items and purchased GMV attributed to the Campaign.
It answers the question: which Merchants, sellers, or sales channels were the source of purchases attributed to this campaign?
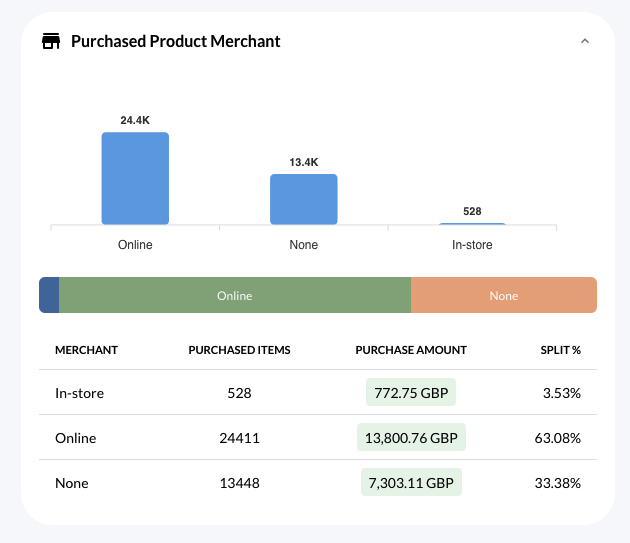
Merchant reporting has two common uses:
- Multi-seller reporting for marketplaces: see which Merchant or storefront fulfilled the campaign's attributed sales.
- ROPO (Research Online, Purchase Offline) reporting for brick & mortar retailer: split attributed sales by whether the purchase happened in-store or online.
How it works
Every purchase you send to Kevel can carry a merchantId (see Purchase Events). When a purchase is attributed to a Campaign, Kevel groups the attributed purchased line items and purchased GMV by that Merchant and surfaces the breakdown in Console.
The value shown is whatever you record on the purchase — so the Merchant dimension is only as meaningful as the merchantId you send. Setting it up is a prerequisite: Send Merchant data in Purchase Events.
What you see
In a Campaign's stats drawer in the dashboard, the Merchant widget shows a table with:
| Column | What it shows |
|---|---|
| Merchant | The Purchased Merchant, configurable to show its ID or Name |
| Purchased Line Items | Count of attributed purchased line items for that Merchant |
| Purchased GMV | Total attributed sales value for that Merchant |
| Split | Each Merchant's share of the Campaign's attributed purchases (optional bar chart) |
Configuration
The Merchant widget can be configured by your Kevel account team as follows:
- Enable or disable the widget on the Campaign stats drawer within the Dashboard.
- Rename the widget title and column labels — e.g. Purchased Merchant → In-Store vs. Online Sales, with columns such as Purchase source / Purchased items / Purchase amount / Split.
- Show Merchant ID or Name — display the raw
merchantIdor a friendlier configured Name.
To enable or adjust the widget, contact your Kevel representative.
Prerequisites
- Send
merchantIdon your purchases — the report is only populated for purchases that carry a Merchant. See Send Merchant data in Purchase Events. - Purchases are attributed to the Campaign — Merchant Reporting reflects attributed purchases, so standard Attribution setup (a persistent
userKeypresent at both ad time and purchase time) applies. - Ask Kevel to enable the widget on your account.
Updated about 1 month ago